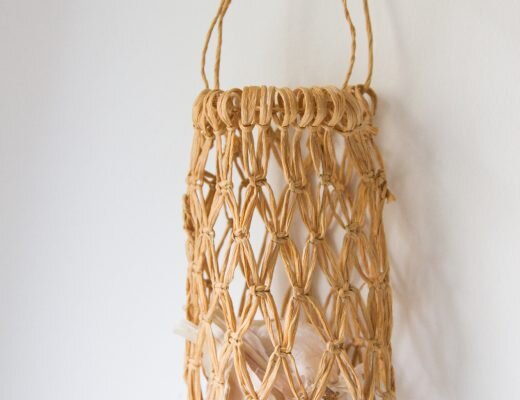
We’re notoriously rough on our tables around here. Sometimes-work surface, sometimes-dining table, sometimes-roof for weekend forts, the tables in our apartment see a lot of use. And while I couldn’t be more excited to welcome a new workhorse into our lives in just a few weeks, I’m mindful that it might be nice to treat a new addition to our apartment with just a smidge more reverence. I’ve been searching for placemats to love and Rose reminded me of the simplest solution for bringing hot dishes and teapots to the table: a Japanese-style trivet made from simple materials I already had at home.
“You can find this kitchen basic where the hot kettle rests when off the stove; or separating a skillet from the countertop, or a hot casserole from your wooden table,” Rose explained. “And as with every craft I like to create, its simple materials and natural texture make it an object worthy of display even in the most pared down of kitchens.” In other words: perfect.
For this project, Rose deliberately sourced materials that would be easy to find at any hardware store: “I wanted to make this trivet using only one material—twine–and forgo the need for additional craft supplies like round wooden rings.”
Best of all: the project is super simple and very quick to finish. If you have need for a larger or smaller trivet, the tutorial is also easily adapted, and you can explore making it with different types of heat-safe fibers. Rose notes, “I found jute twine and raffia to be the best suited for this craft because the textured fiber conceals any mistakes when knotting and will not slip around on slick surfaces.” One more tip I have after making a few of these, is to make sure your hands are well moisturized before you start working with the jute. It will help the jute slide through your fingers and will be less likely for them to get irritated as you knot! Now, for the instructions from Rose:
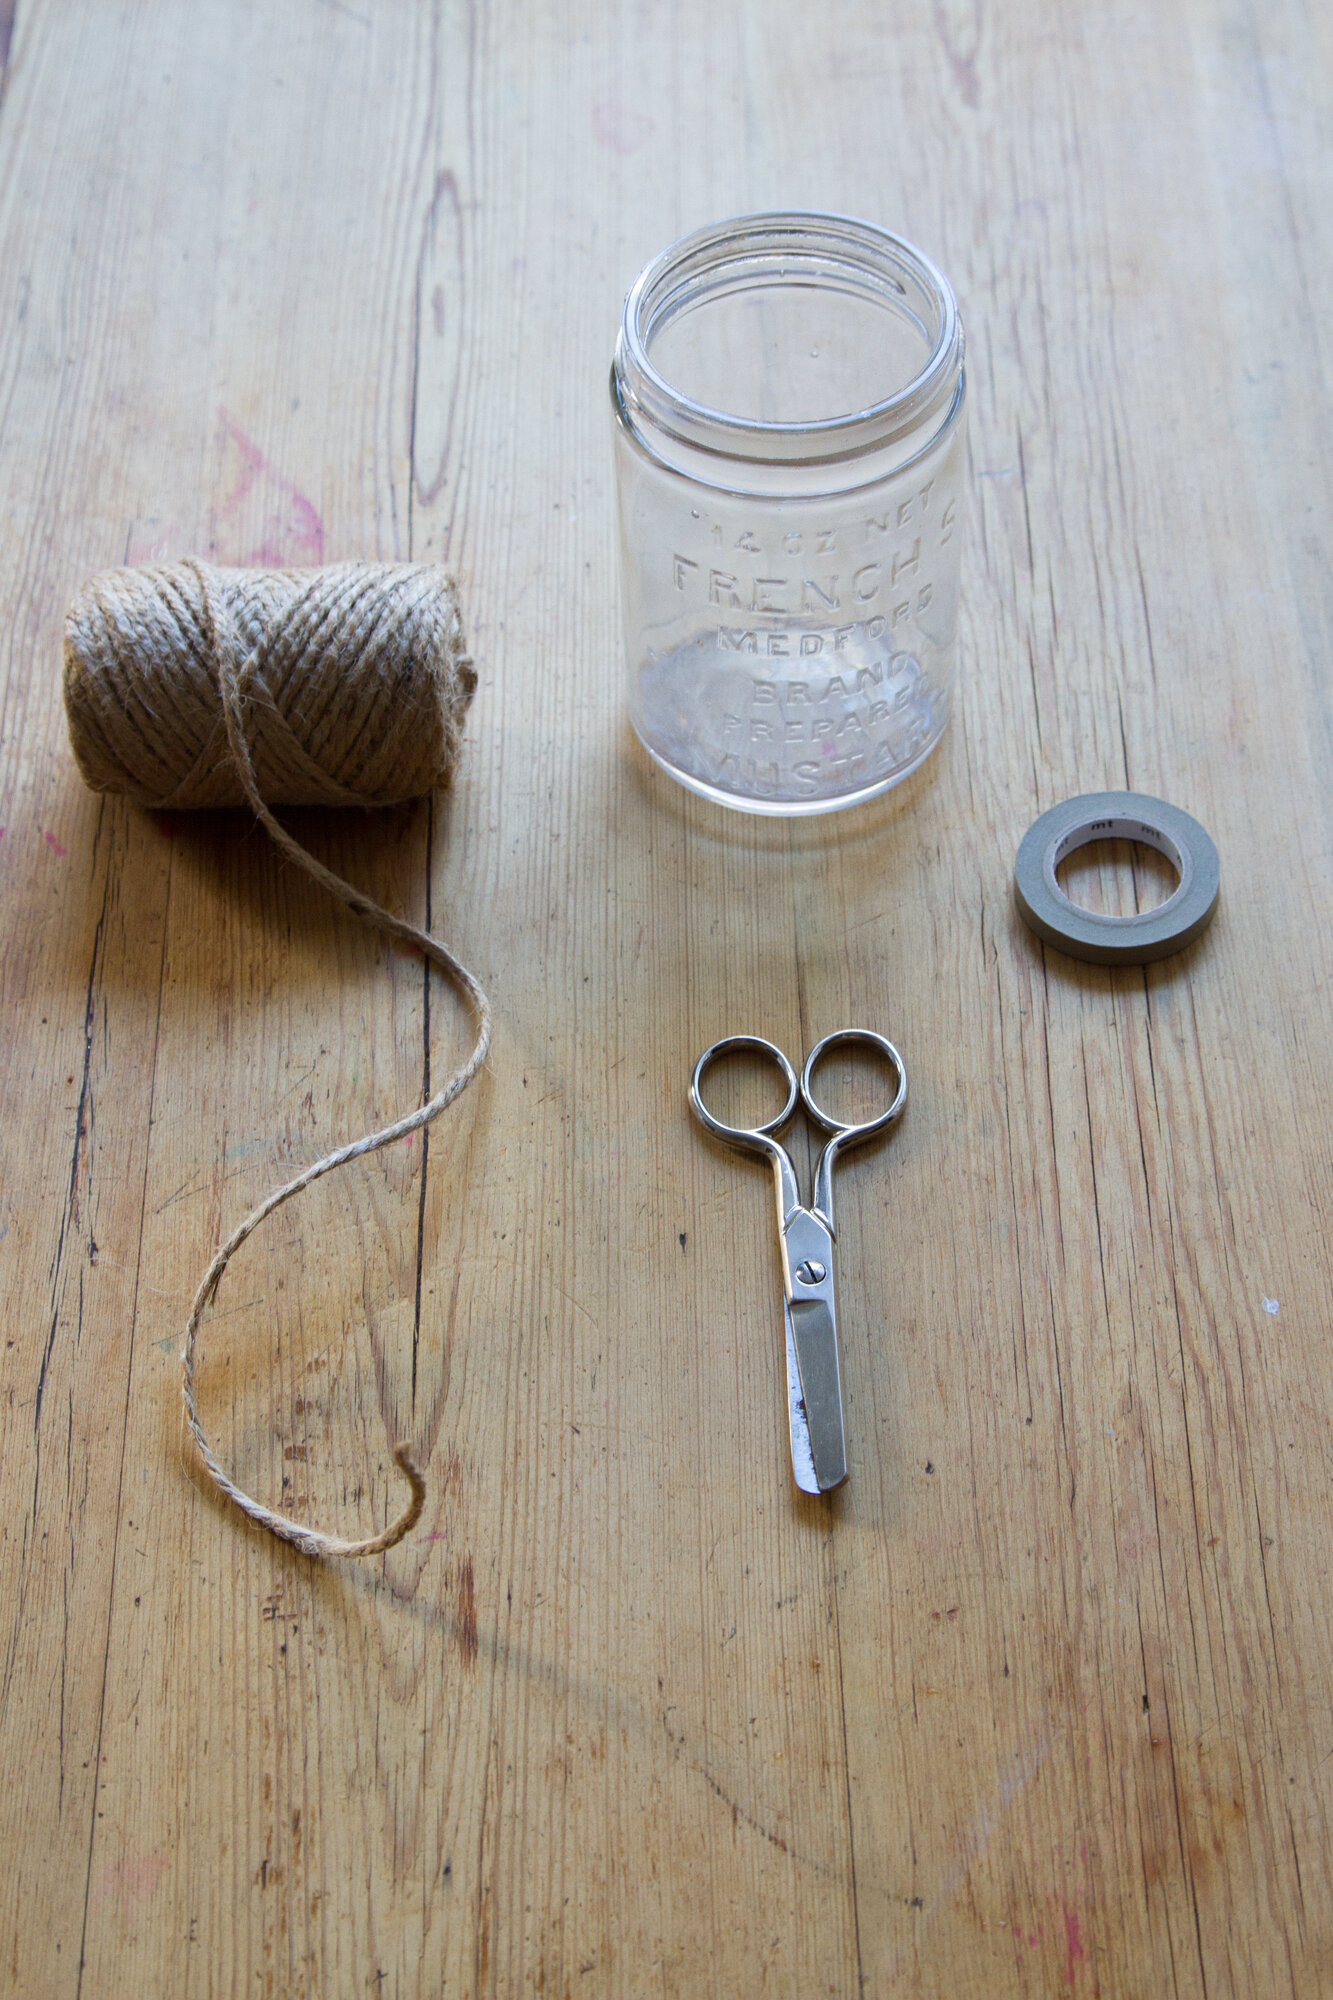
Materials:
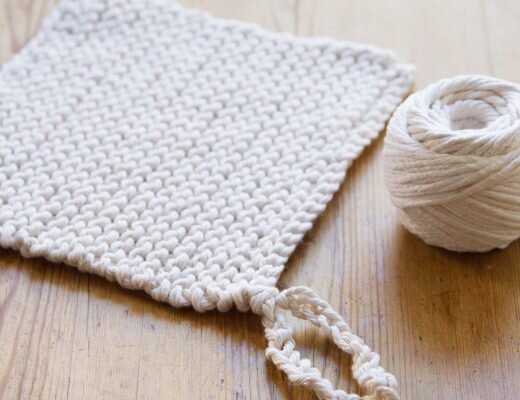
+ 2-ply Jute Twine (1-3mm) or raffia
+ Cylindrical jar or container roughly 4-6-inches in circumference such as yogurt containers, Quaker oats cartons, or mason jars. (The finished trivet will end up only slightly larger than the circumference of your jar.)
+ Masking or washi tape
+ Scissors
+ Ruler
Instructions:
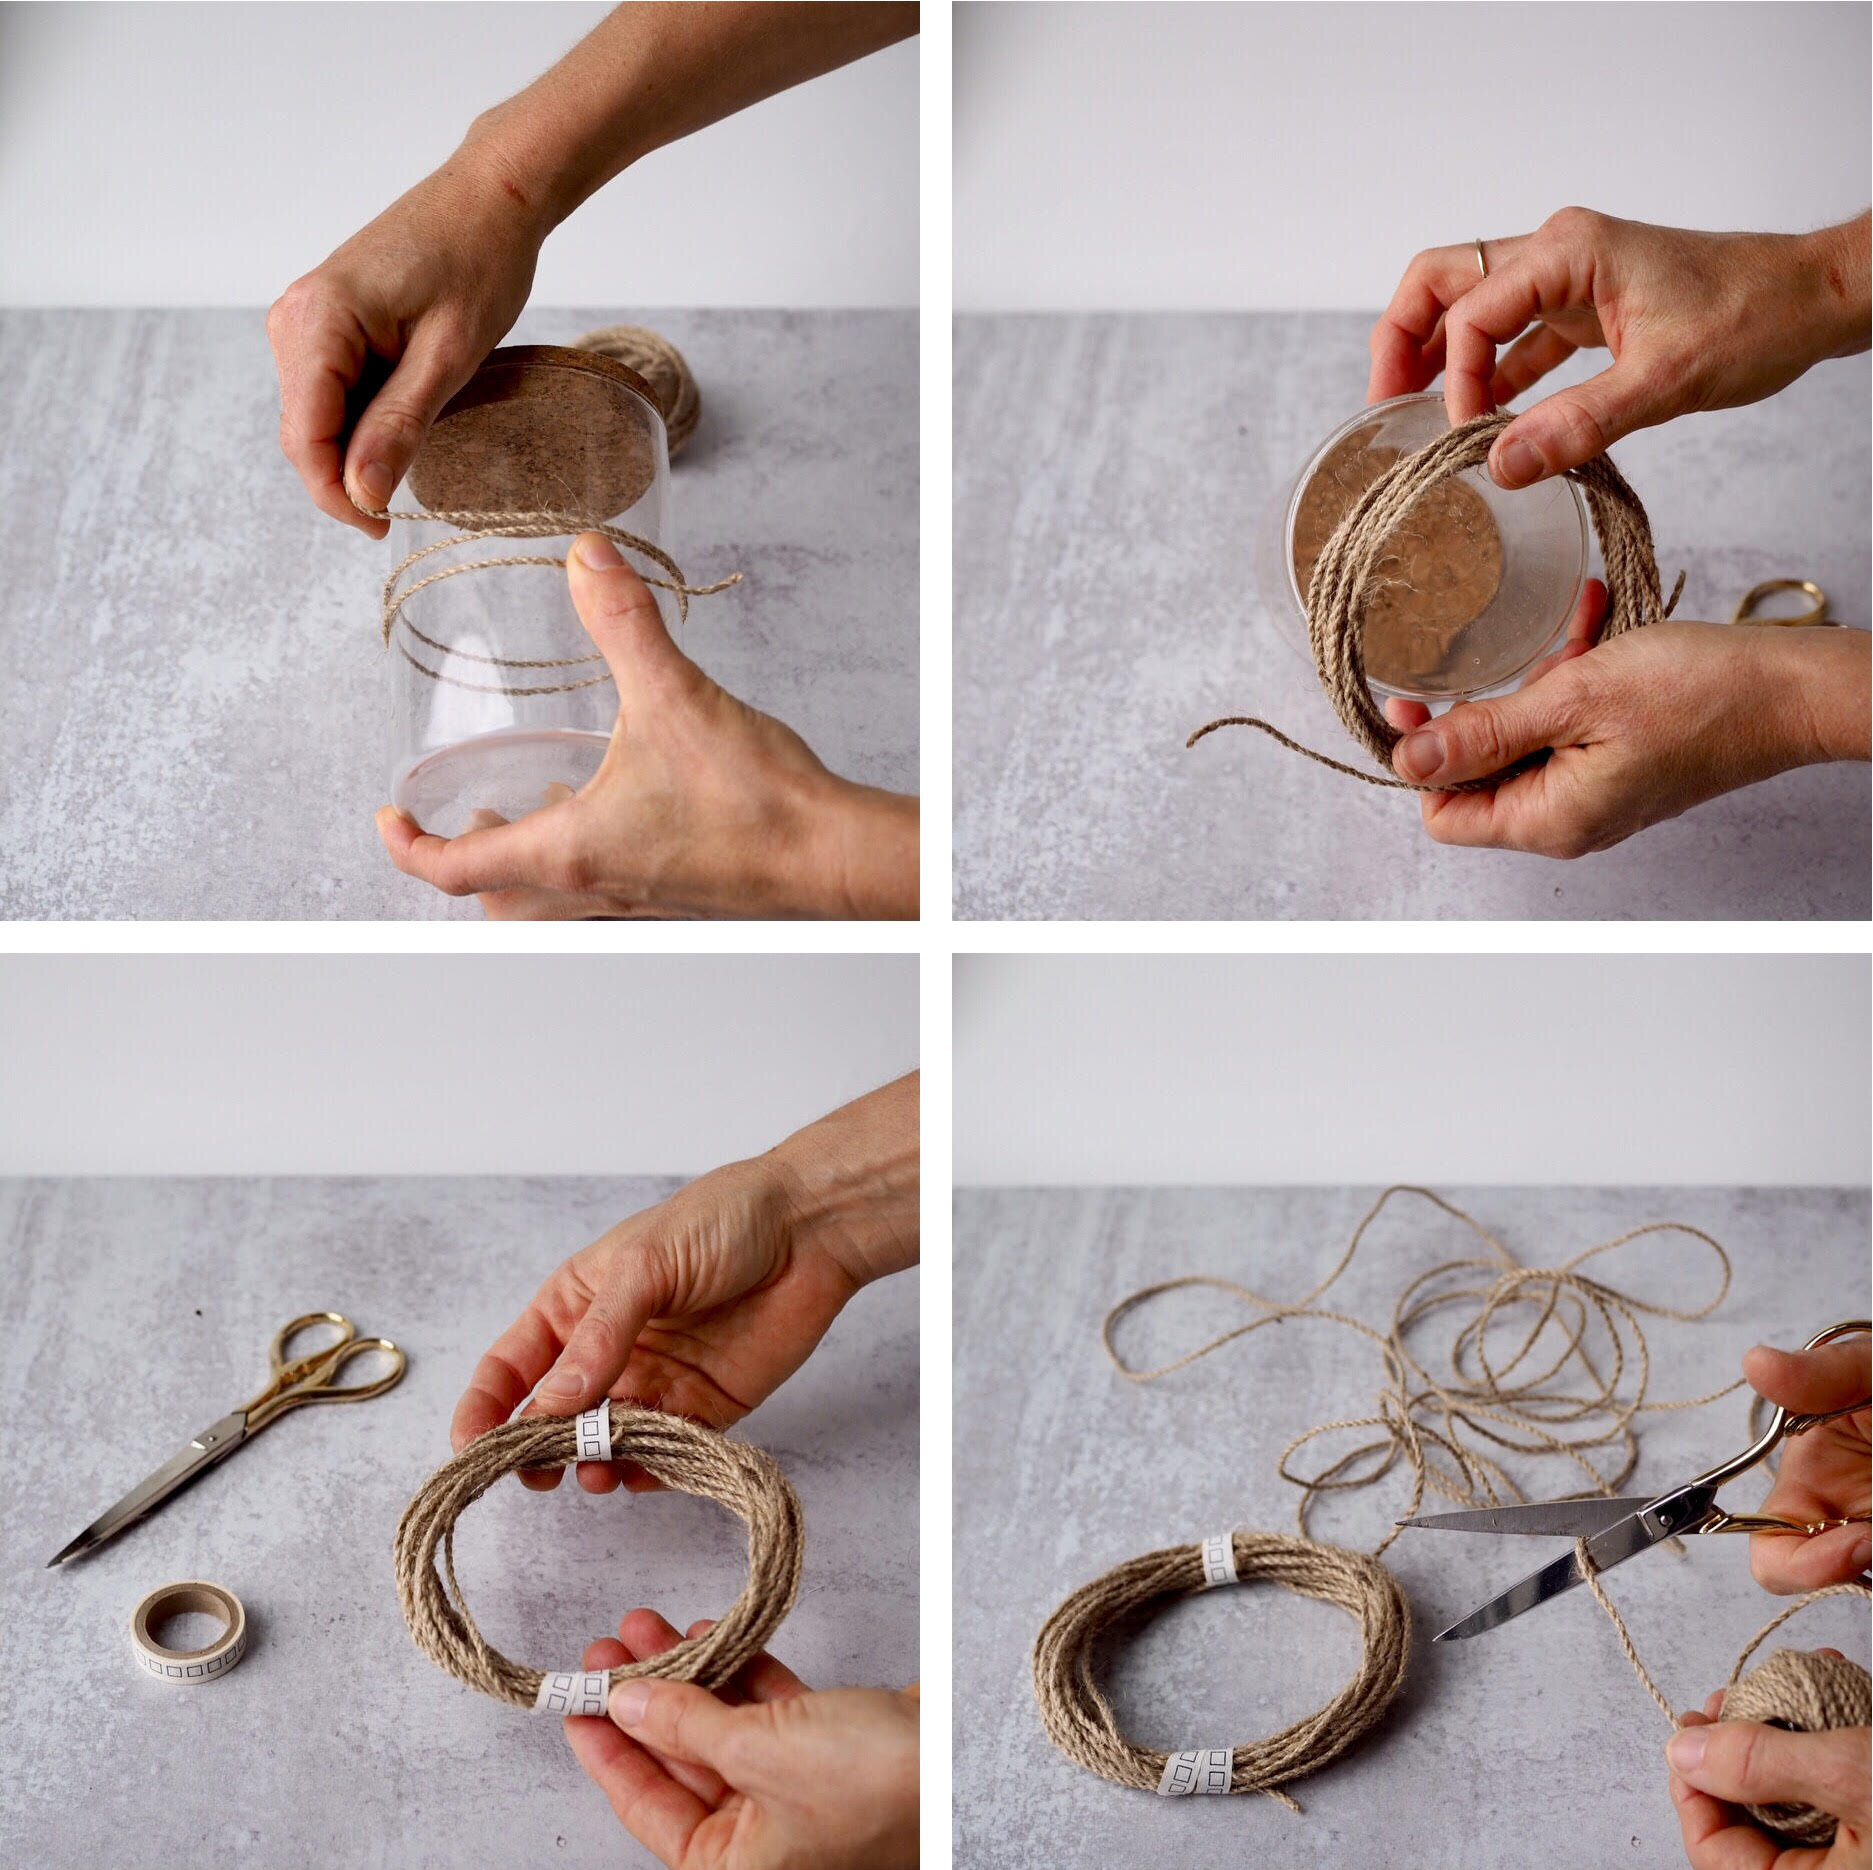
+ Start by wrapping the jute twine around the circumference of the vessel layering the rope as you circle around. You will want at least 14-20 revolutions around the jar to get a thick inner core. Keep the bundle contained to less than a 1 inch in diameter.
+ Cut off the end and tuck it underneath the wrapped string to temporarily secure.
+ Carefully slip the bundled string off your jar. Try to keep the loops in place as you go.
+ Secure masking tape around the bundle in three sections. This will temporarily hold the strings in place while you are working.
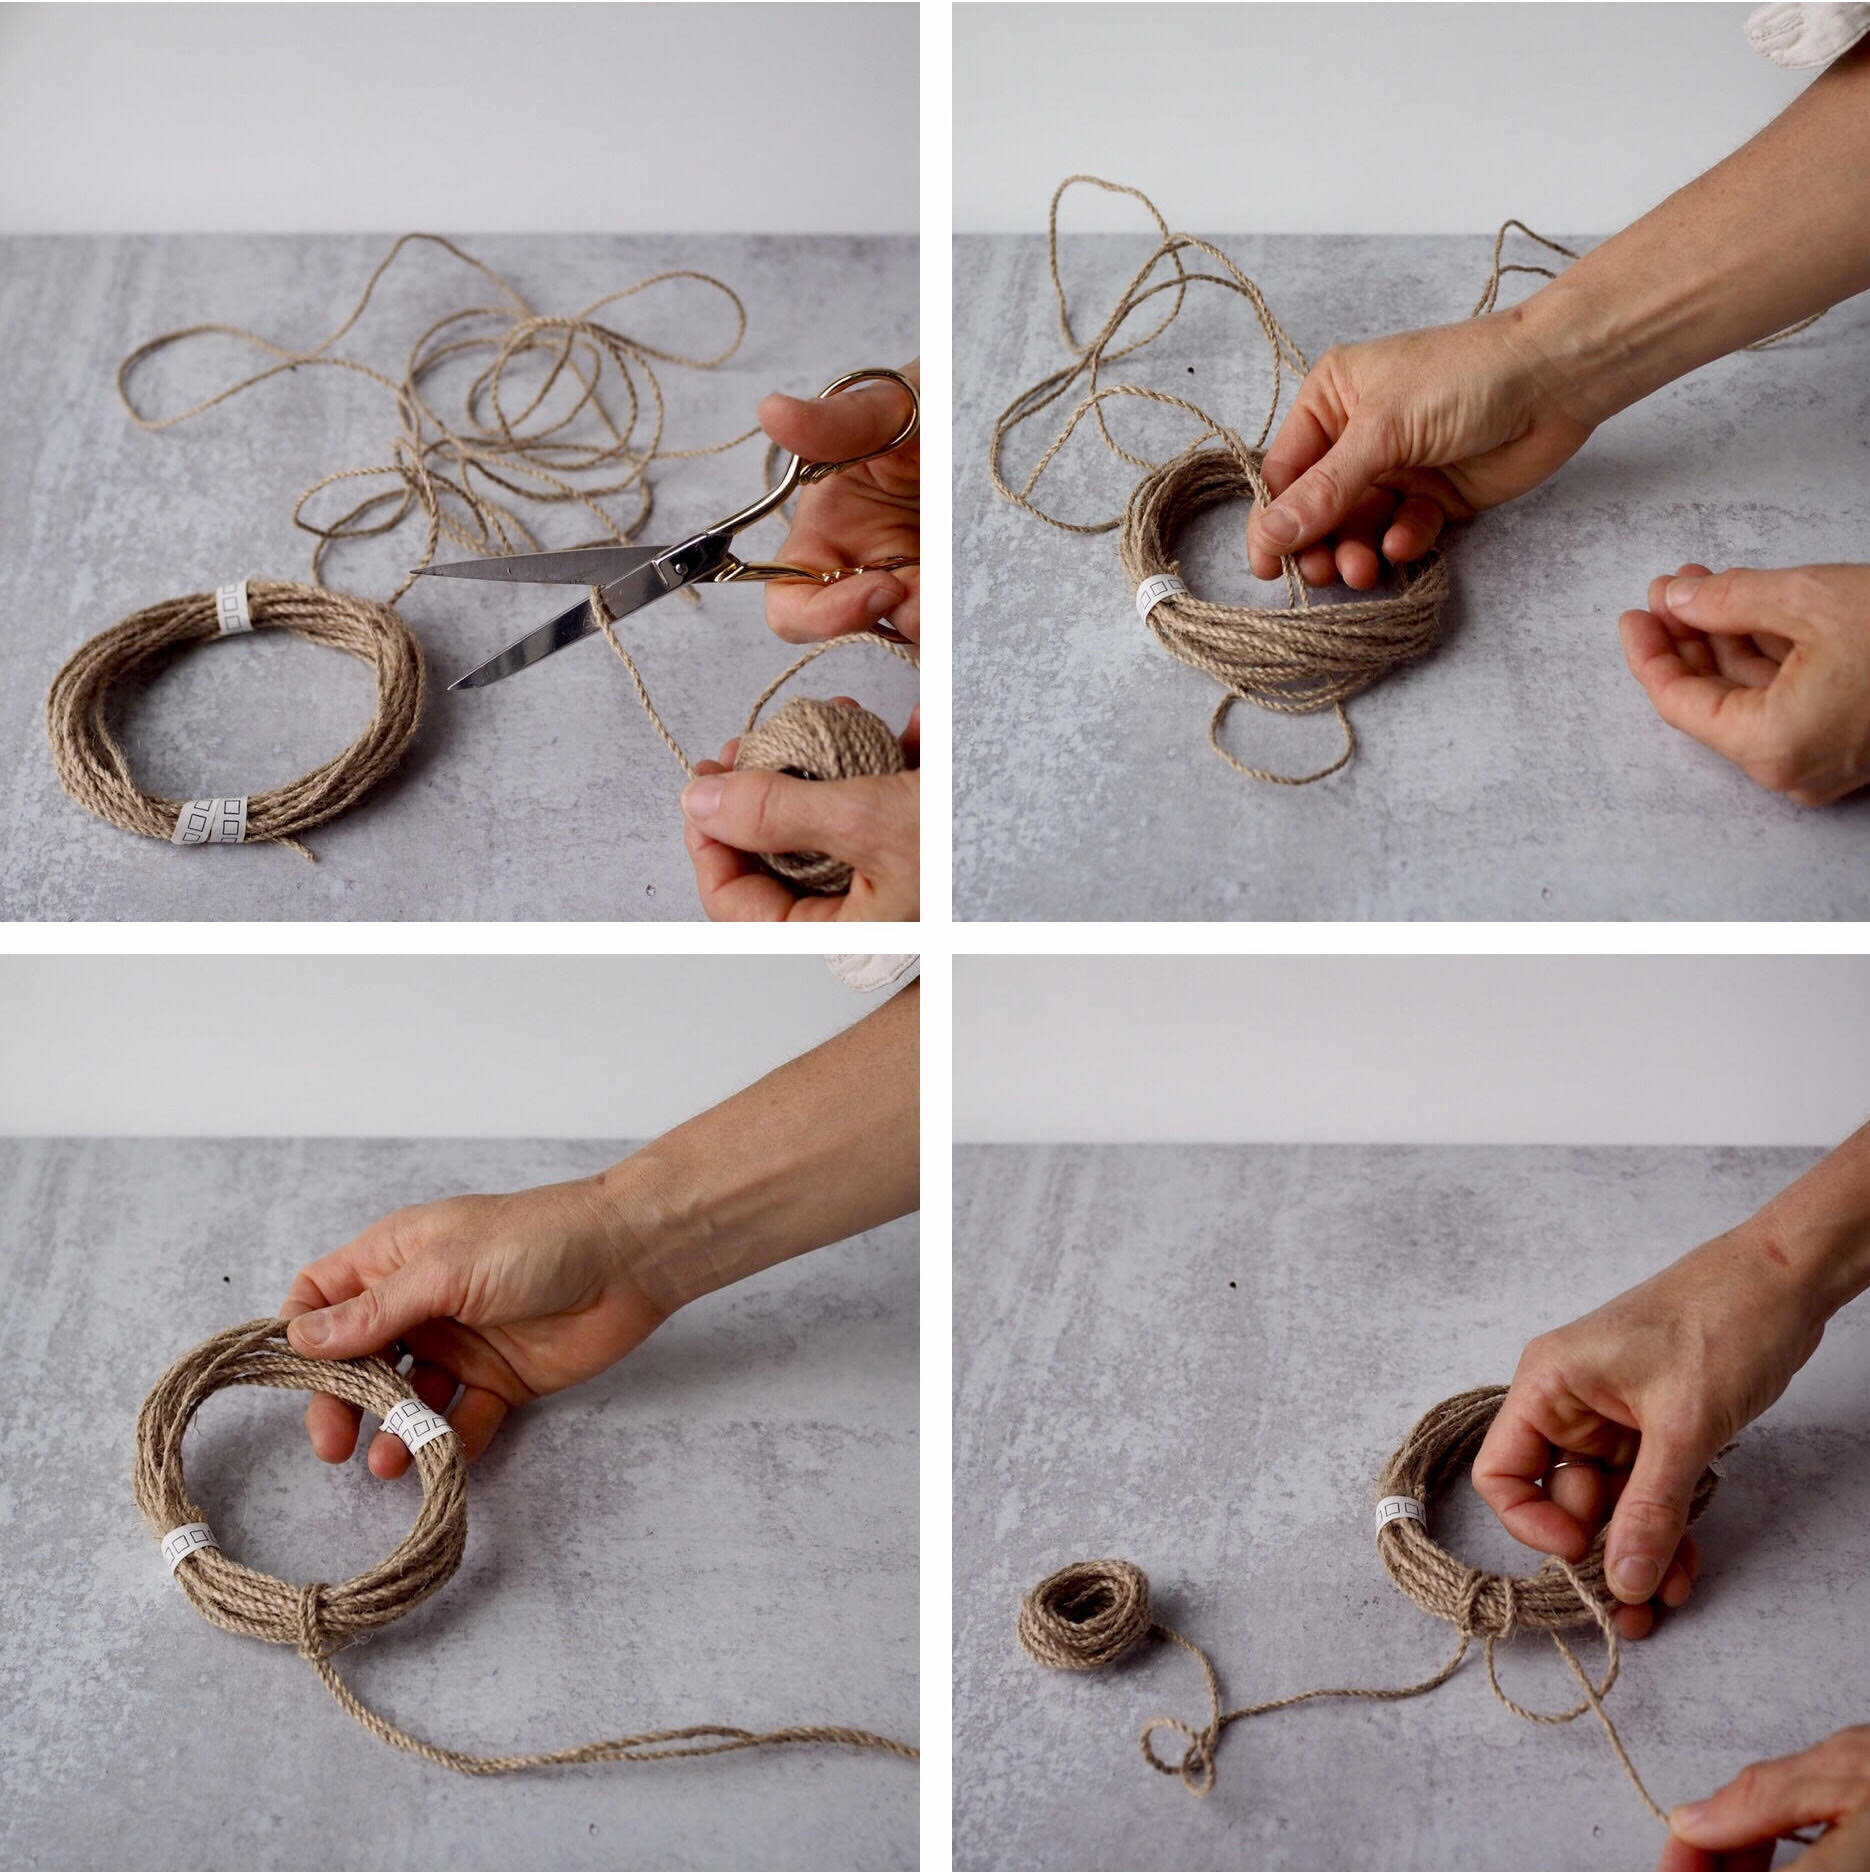
+ Cut an additional long piece of twine roughly 8 to 10 feet given the circumference of your jar. (If you’re unsure, over-estimate how much you need. You can always trim any extra at the end.)
+ Fold the twine in half bringing the center loop over and around the edge of the bundled twine, then thread both ends all the way through the folded loop. Tighten until a hitch knot is secured.
+ The two strings that make up the hitch knot will work in opposite directions around the bundled twine. Starting with one string first, create a loop toward the outside edge of the bundle. Cross the traveling twine back over the front of the bundle then around the back and through the loop. Pull tight to secure, this is a hitch knot.
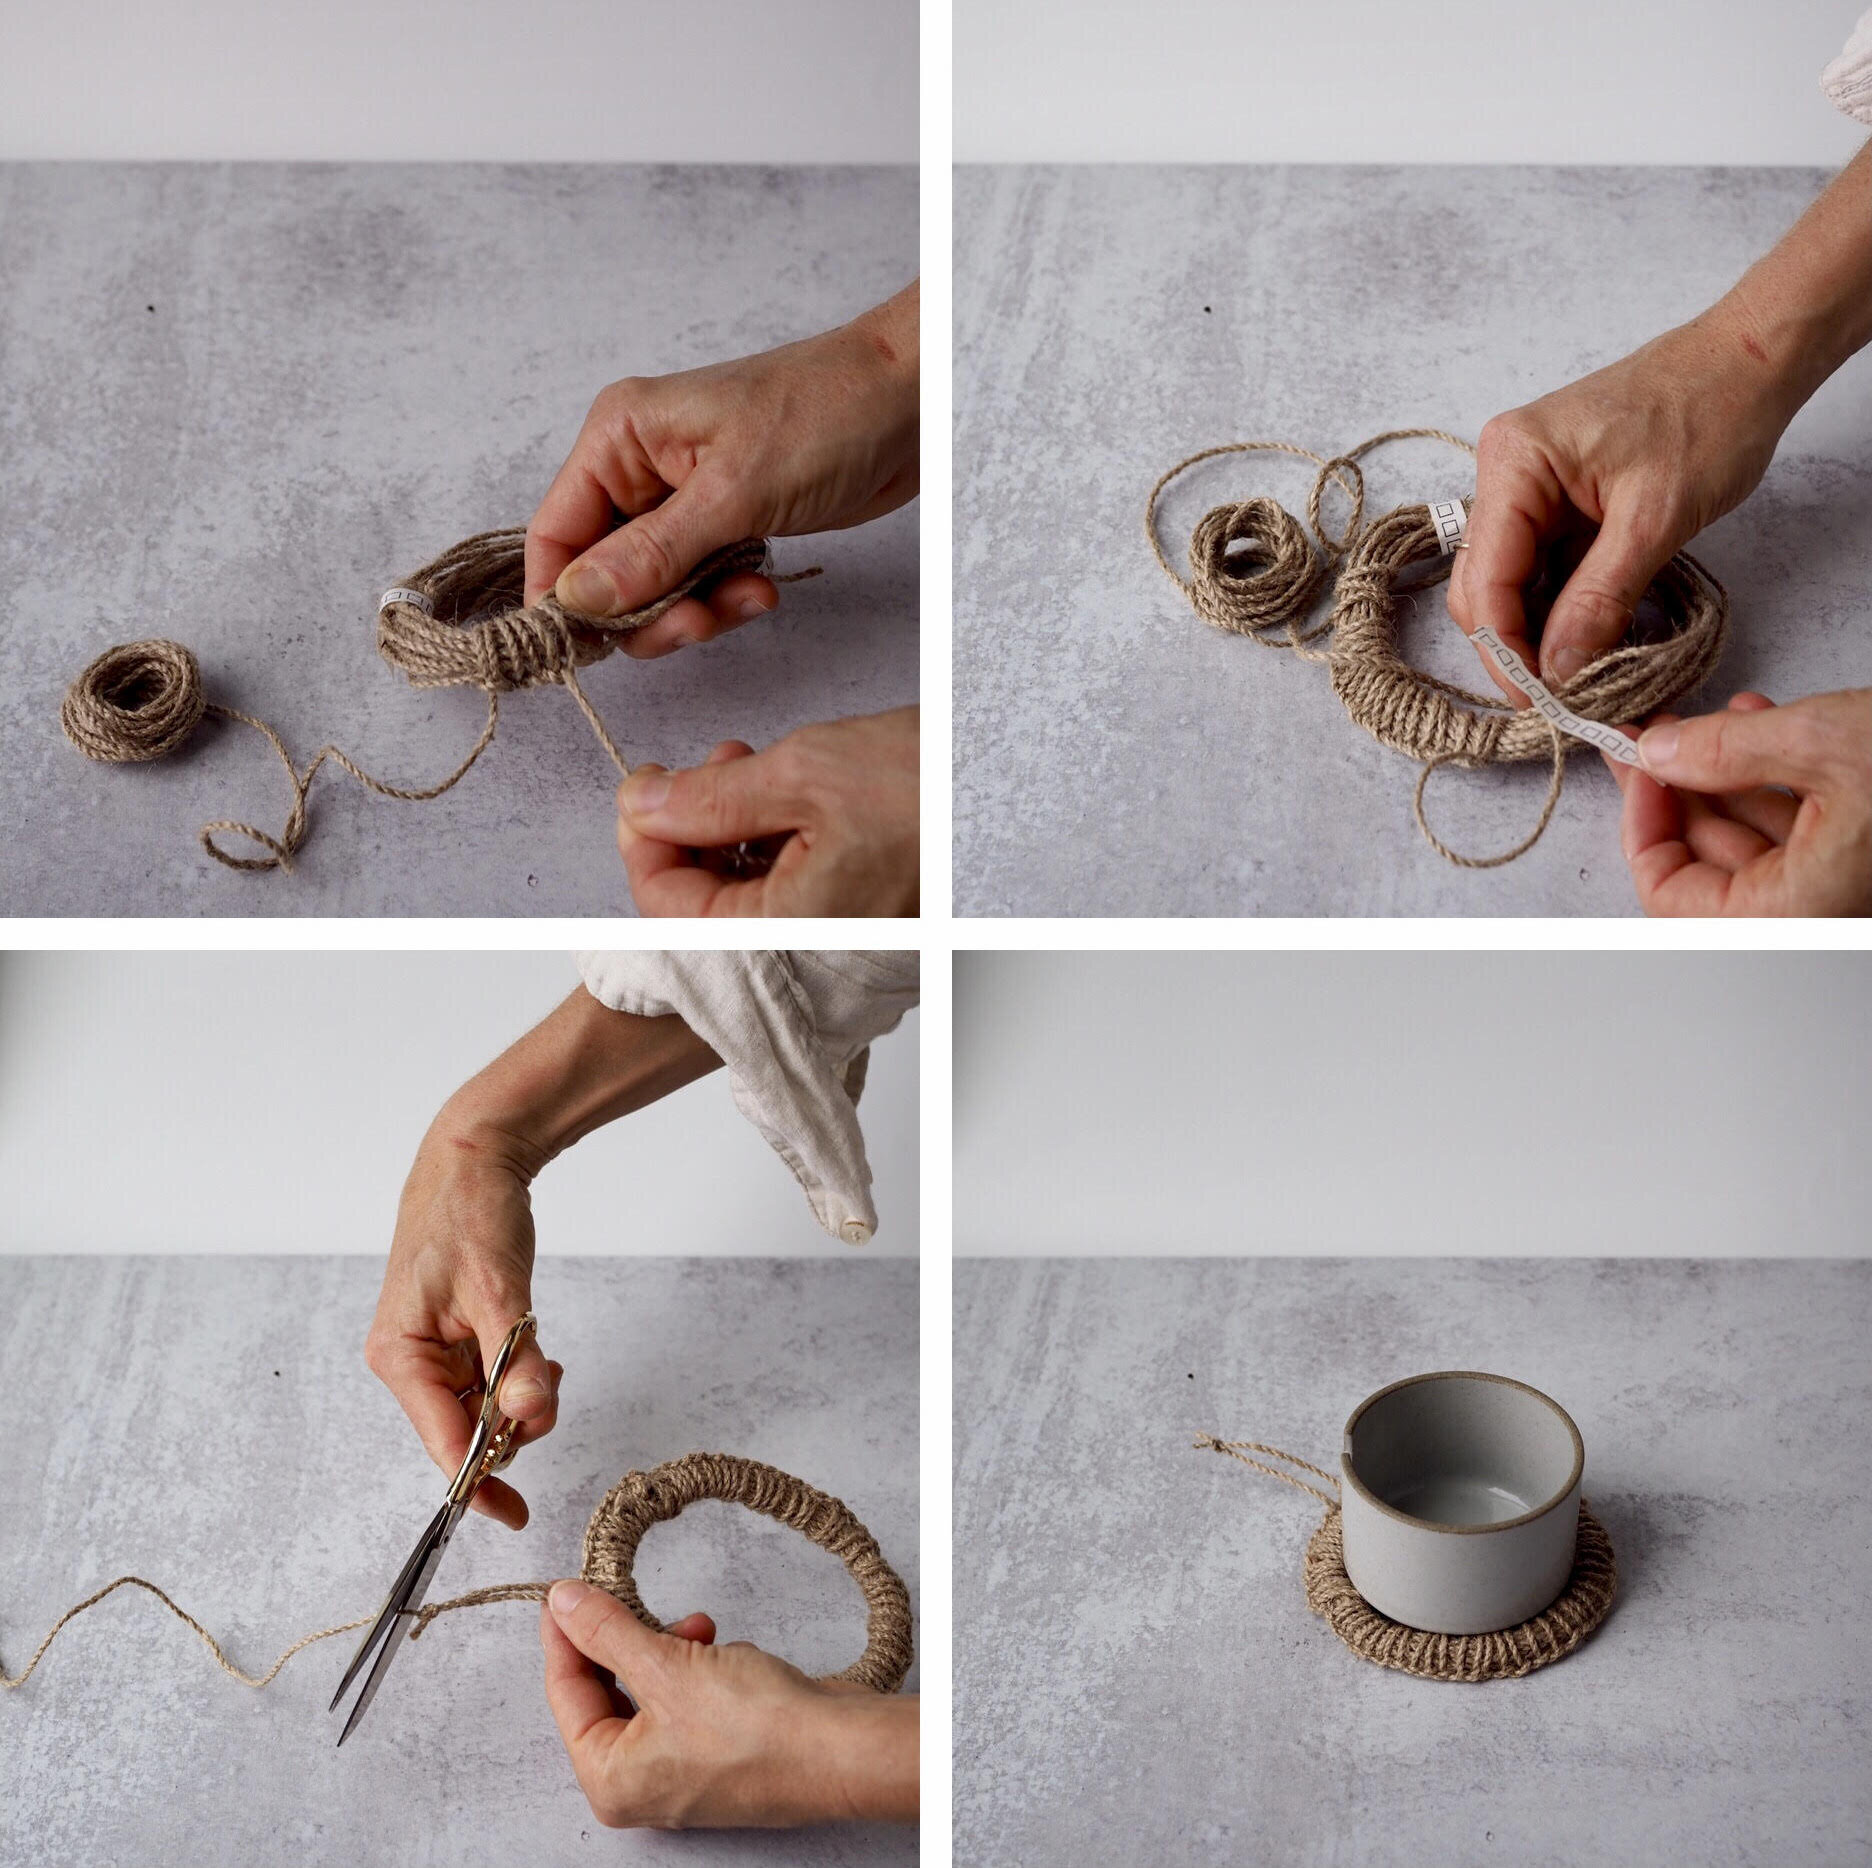
+ Repeat that same hitch knot with the working twine, stacking your loops with only a very small space inbetween. Too tightly stacked and you might run out of string, too loose and your bundle will not be secure.
+ Stop halfway around the bundled circle (or until you run out of string) removing the holding tape as you go. Leave at least a 2 inch tail at the end.
+ Start back at the beginning with the first cast on stitch; work the other side exactly like the first. Be sure your knot is on the outside edge of your wrapped twine so all the knots line up on the outer edge. This knot will be worked opposite to the first.
+ Continue knotting on the outside edge of the bundle, remove the holding tape as you go.
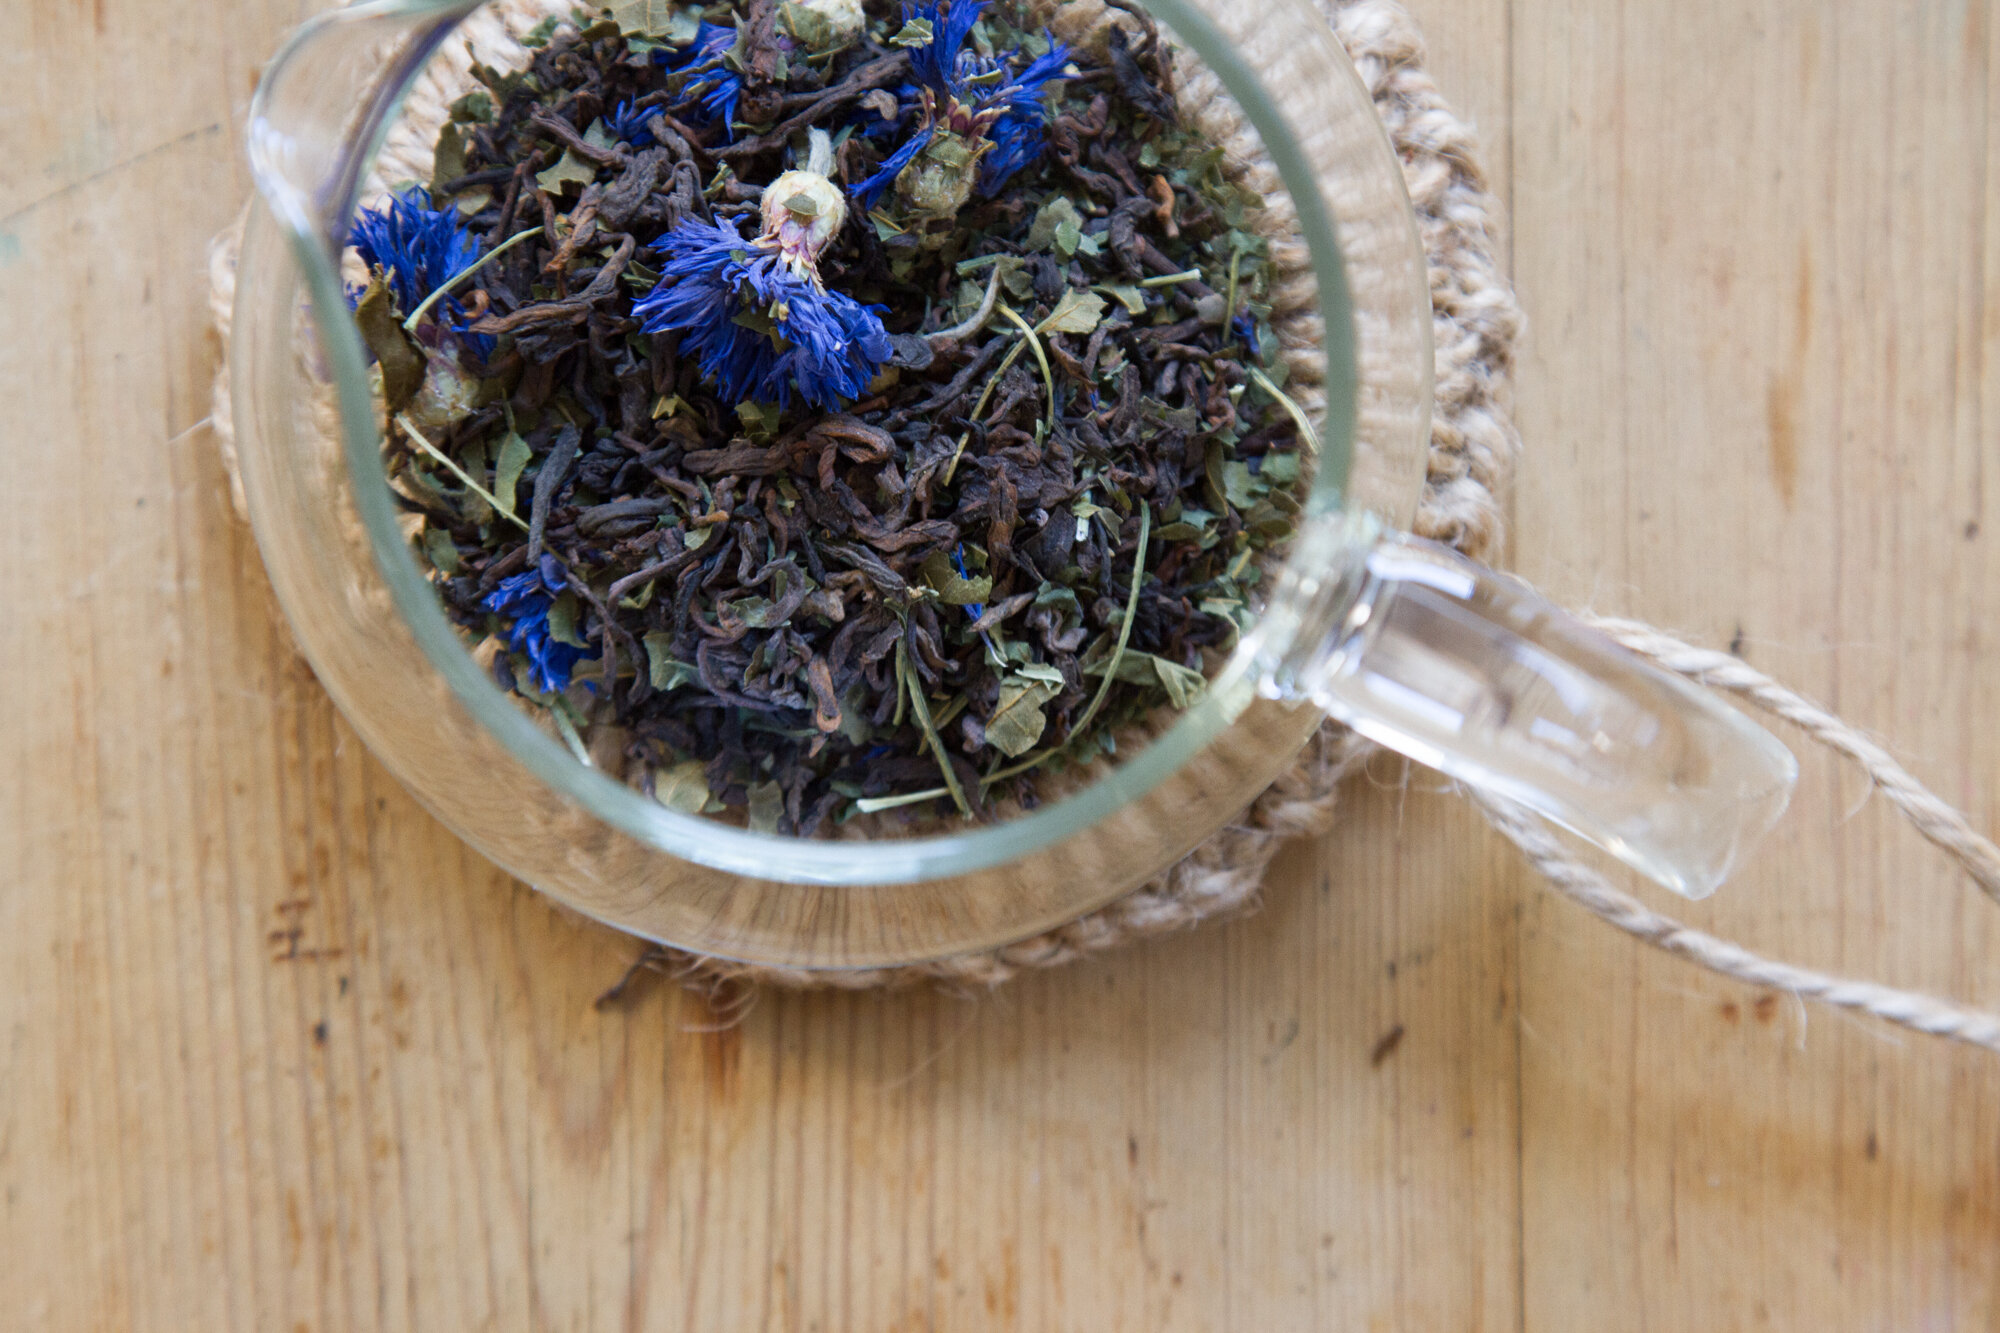
+ Once you reach the center or where the two sides meet, tie the two ends together with a simple knot close to the base of the ring. Leave a 1-inch space and knot a second time creating a little loop. Cut off any extra twine.
+ You may want to move the stacked loops to evenly space them around your bundle. If you run out of twine while covering the core, this might help to evenly distribute the loops.
For the curious:
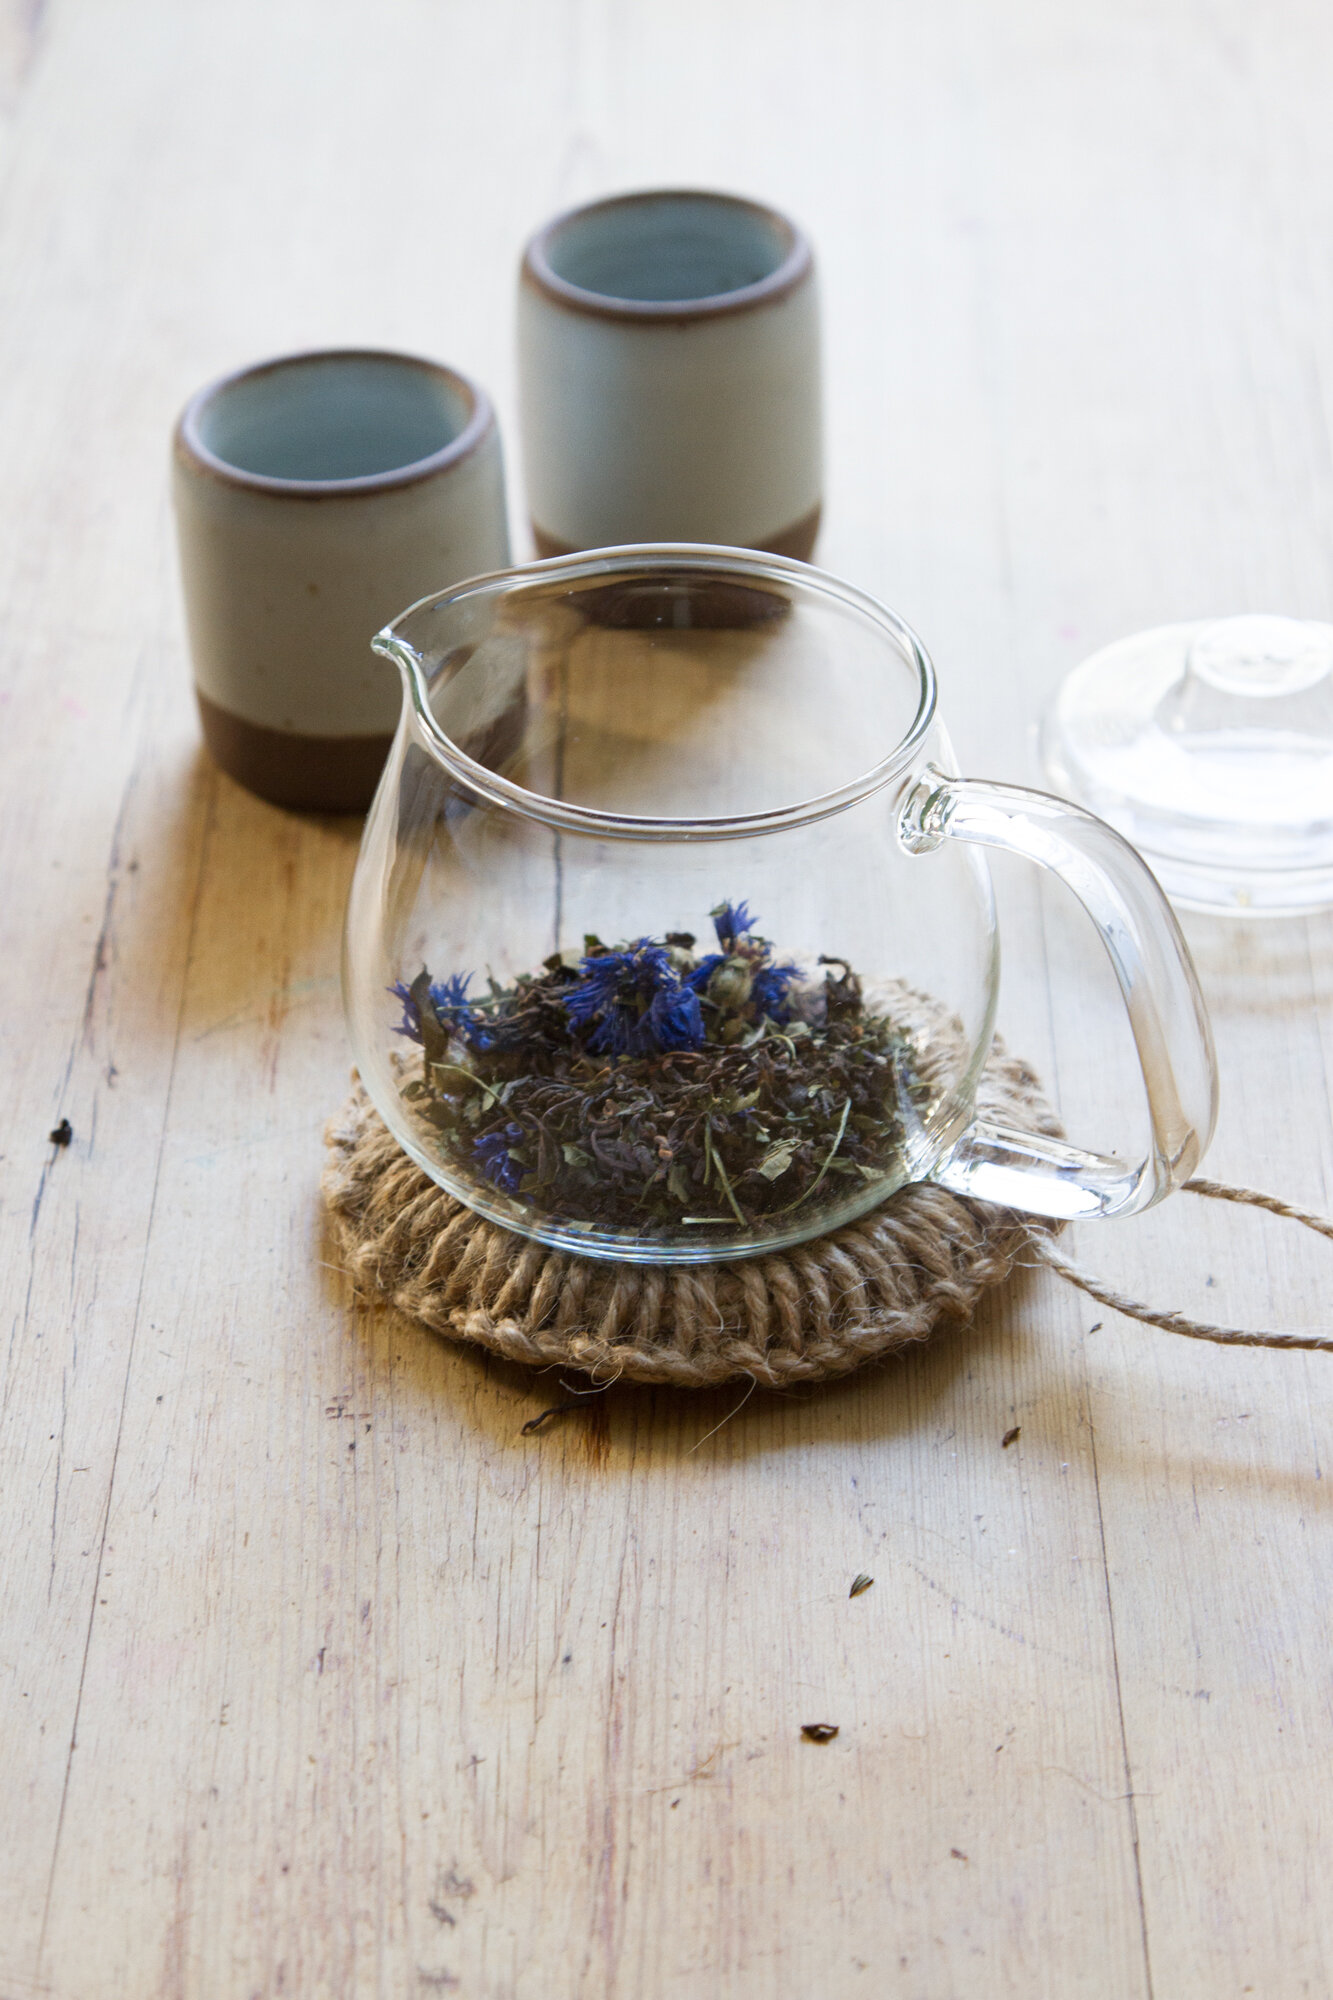
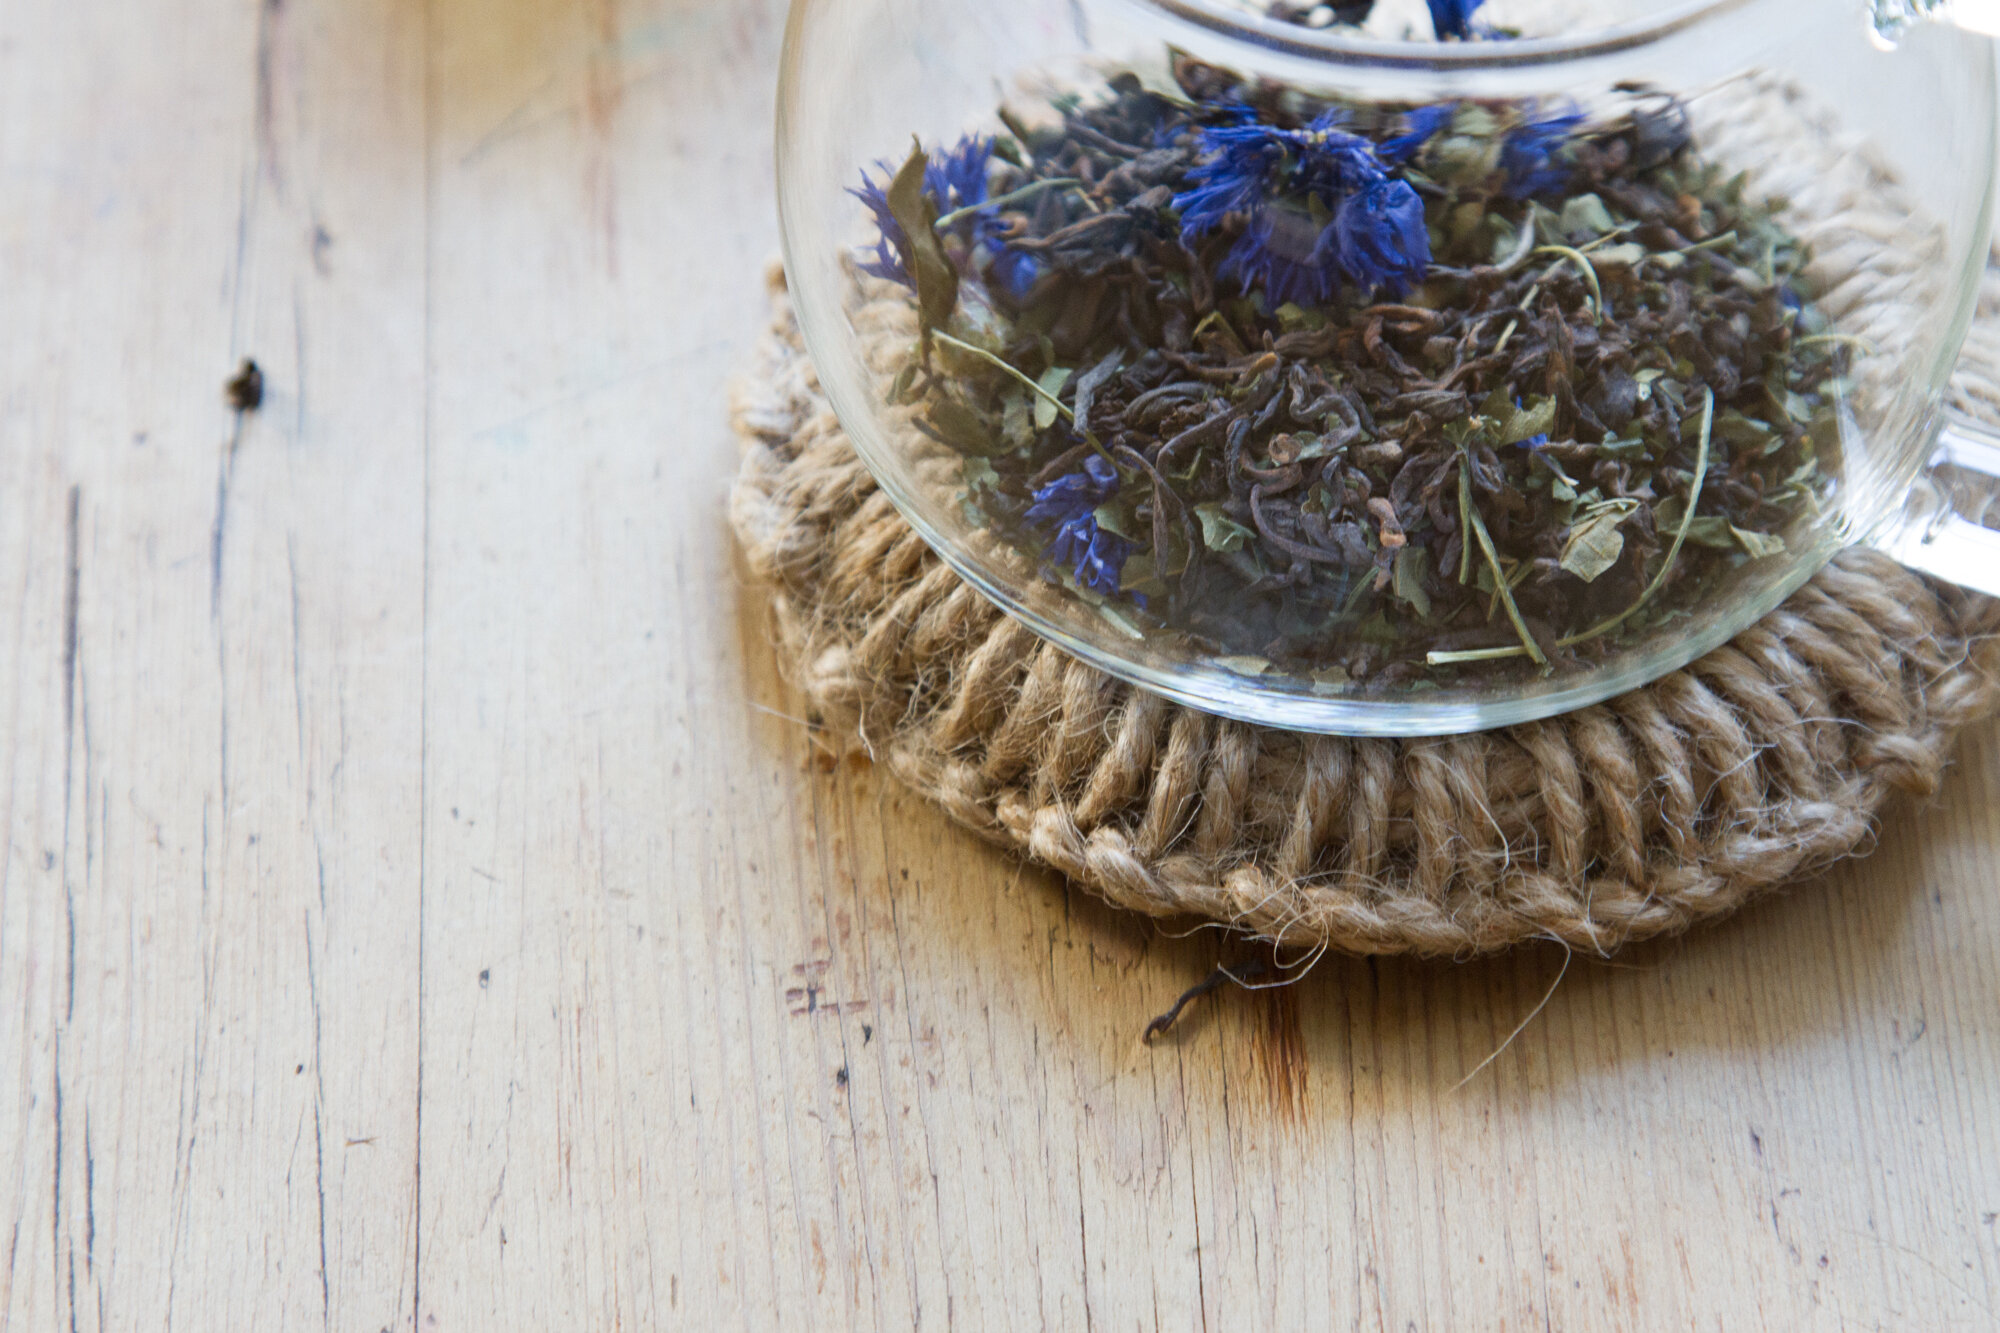
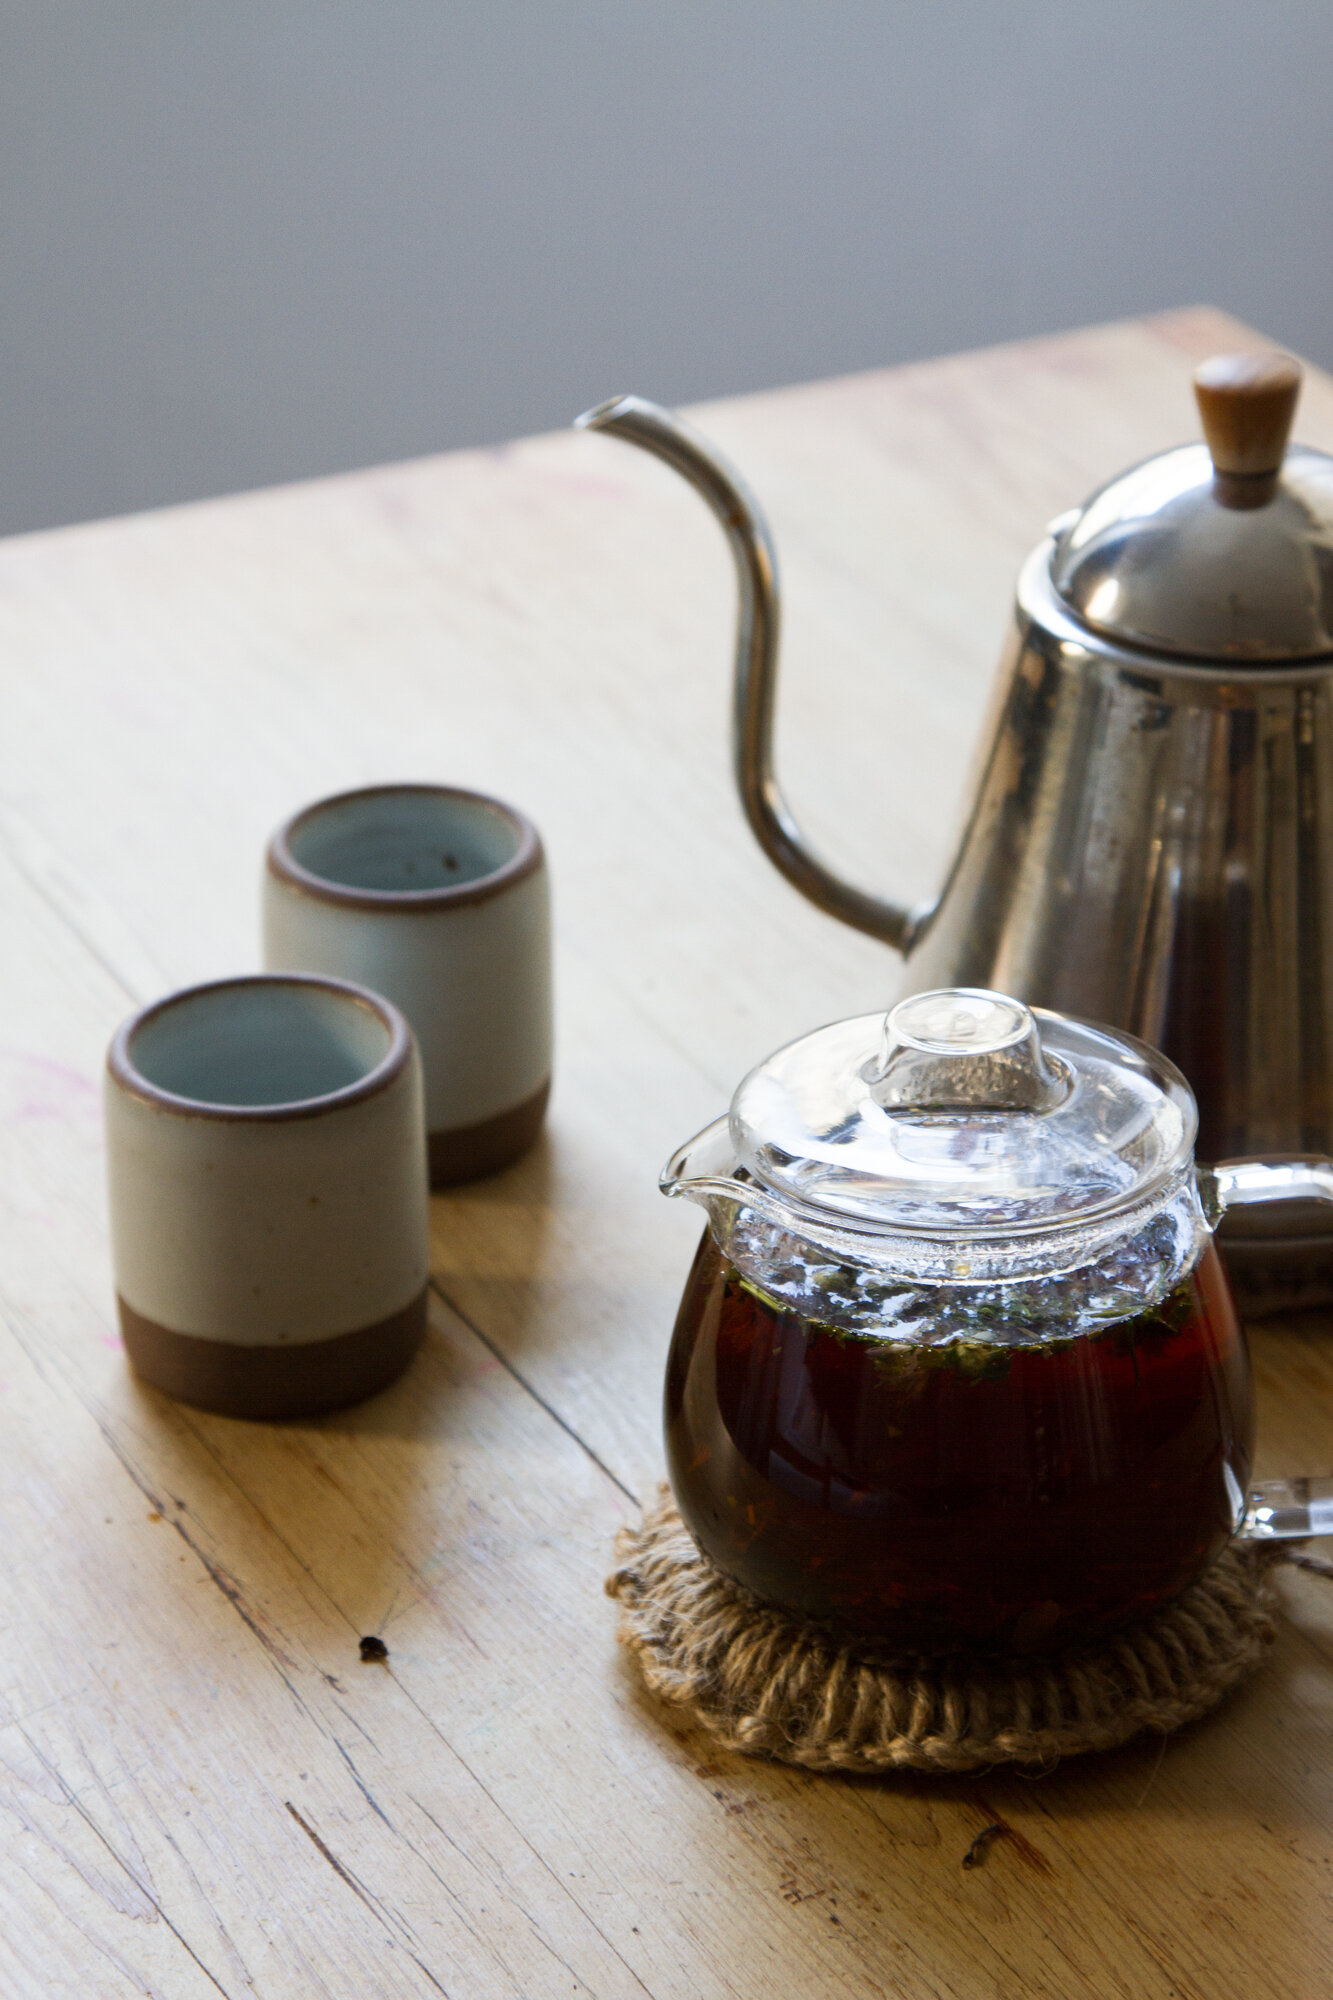
+ The tiny mugs are from East Fork Pottery.
+ The beautiful tea is from Marble & Milkweed.
+ The little teapot I found many moons ago and have since broken the strainer that came with it. Here’s a similar glass teapot I love the look of.
+ An intense moisturizer for protecting your precious hands (et cetera). Or, a heavy-duty salve to make yourself.
Thanks to Rose Pearlman for developing this project, writing the instructions, and capturing the imagery. Rose is an artist, teacher, and textile designer. With a background in fine arts and a love of well designed functional objects, her creations blur the lines between art and craft and pushes the boundaries with non-traditional techniques and materials. Rose teaches monthly rug hooking workshops in and around her home in NYC, and also welcomes commissions for one of a kind constructions in decor and home furnishings. Her work has been featured in fiber magazines, galleries, and numerous online design sites. Her new book Modern Rug Hooking comes out December 3, 2019 and is currently available for preorder wherever books are sold. She lives in Brooklyn, NY with her family.
Step-by-step process photos by Rose Pearlman. All other photos by Erin Boyle.
This post includes affiliate links. Reading My Tea Leaves might earn a small commission on the goods purchased through those links.

13 Comments
What a neat and wonderful project ♥ I love how simple and rather beautiful it turned out!
This a is great idea! Loving your Rose Pearlman posts —definitely inspired!
Yay! Thank you! You’d be so good at making them!
In case you’re looking for more placemat inspiration:
https://www.shopuashmamausa.com/collections/home-table/products/placemats?variant=7560238661
I discovered these after getting tired of cloth placements that require lots of washing and get stained easily, but also not wanting plastic placements. They’re made of paper that gets “tanned” so it’s really durable and seems like it has a coating. If you spill on them you can wipe them off. If you set something wet on them, they eventually absorb a little water, but they dry out without any discoloration. I love them!! I think woven sloth placemats look better but I love that these don’t have to be washed constantly and still look pretty good.
Ha, yes! They’re on my non-Etsy running list! We have a bunch of their bags and love them.
On the placemat front, we’ve been using plain round cork placemats and smaller round coasters. They’ve held up really well so far – 4 years and counting. If something gets spilled on one I just rinse it or wash lightly with a cloth or sponge and detergent. I also like the way they roll and feel sturdy stacking and unstacking them. Nice and plain and simple 🙂
Erin, you seriously showcase the best DIY projects. Functional, simple, plastic-free, beautiful. I appreciate them! God bless.
I appreciate you! Thanks so much!
These are amazing! Thank you Erin and Rose.
I have a glass tea pot from Hario.( And the glass tea cups too. They are about perfect, we use the cups for everything… Tea, yogurt, snacks, sauces, hot chocolate, and cooking prep bowls. Truly multifunctional, we have 11 cups and a family of 4. We use every cup every day.) Now I shall make a trivet for my tea pot, I didn’t realize they could be so easy to make. Thank you!!!
I follow you via instagram and you are truly inspirationnal. I have been feeling a lot disconnected from my “crafty side” lately but these little beautiful projects make me want to go back to it. So thanks a lot!
Have a great holiday!
I’m so glad! Happy crafting!
Hey. So happy to have found this so thanks for putting it out there. I’m using a jute that seams to me a bit thinner then the one you used in the tutorial. Any way you could let me know what type of jute you used or where to purchase it? It Almost looks like natural cordage the way it’s braided together. Thanks!
Not sure the exact gauge I used here, but it’s just hardware store jute!
Comments are moderated.