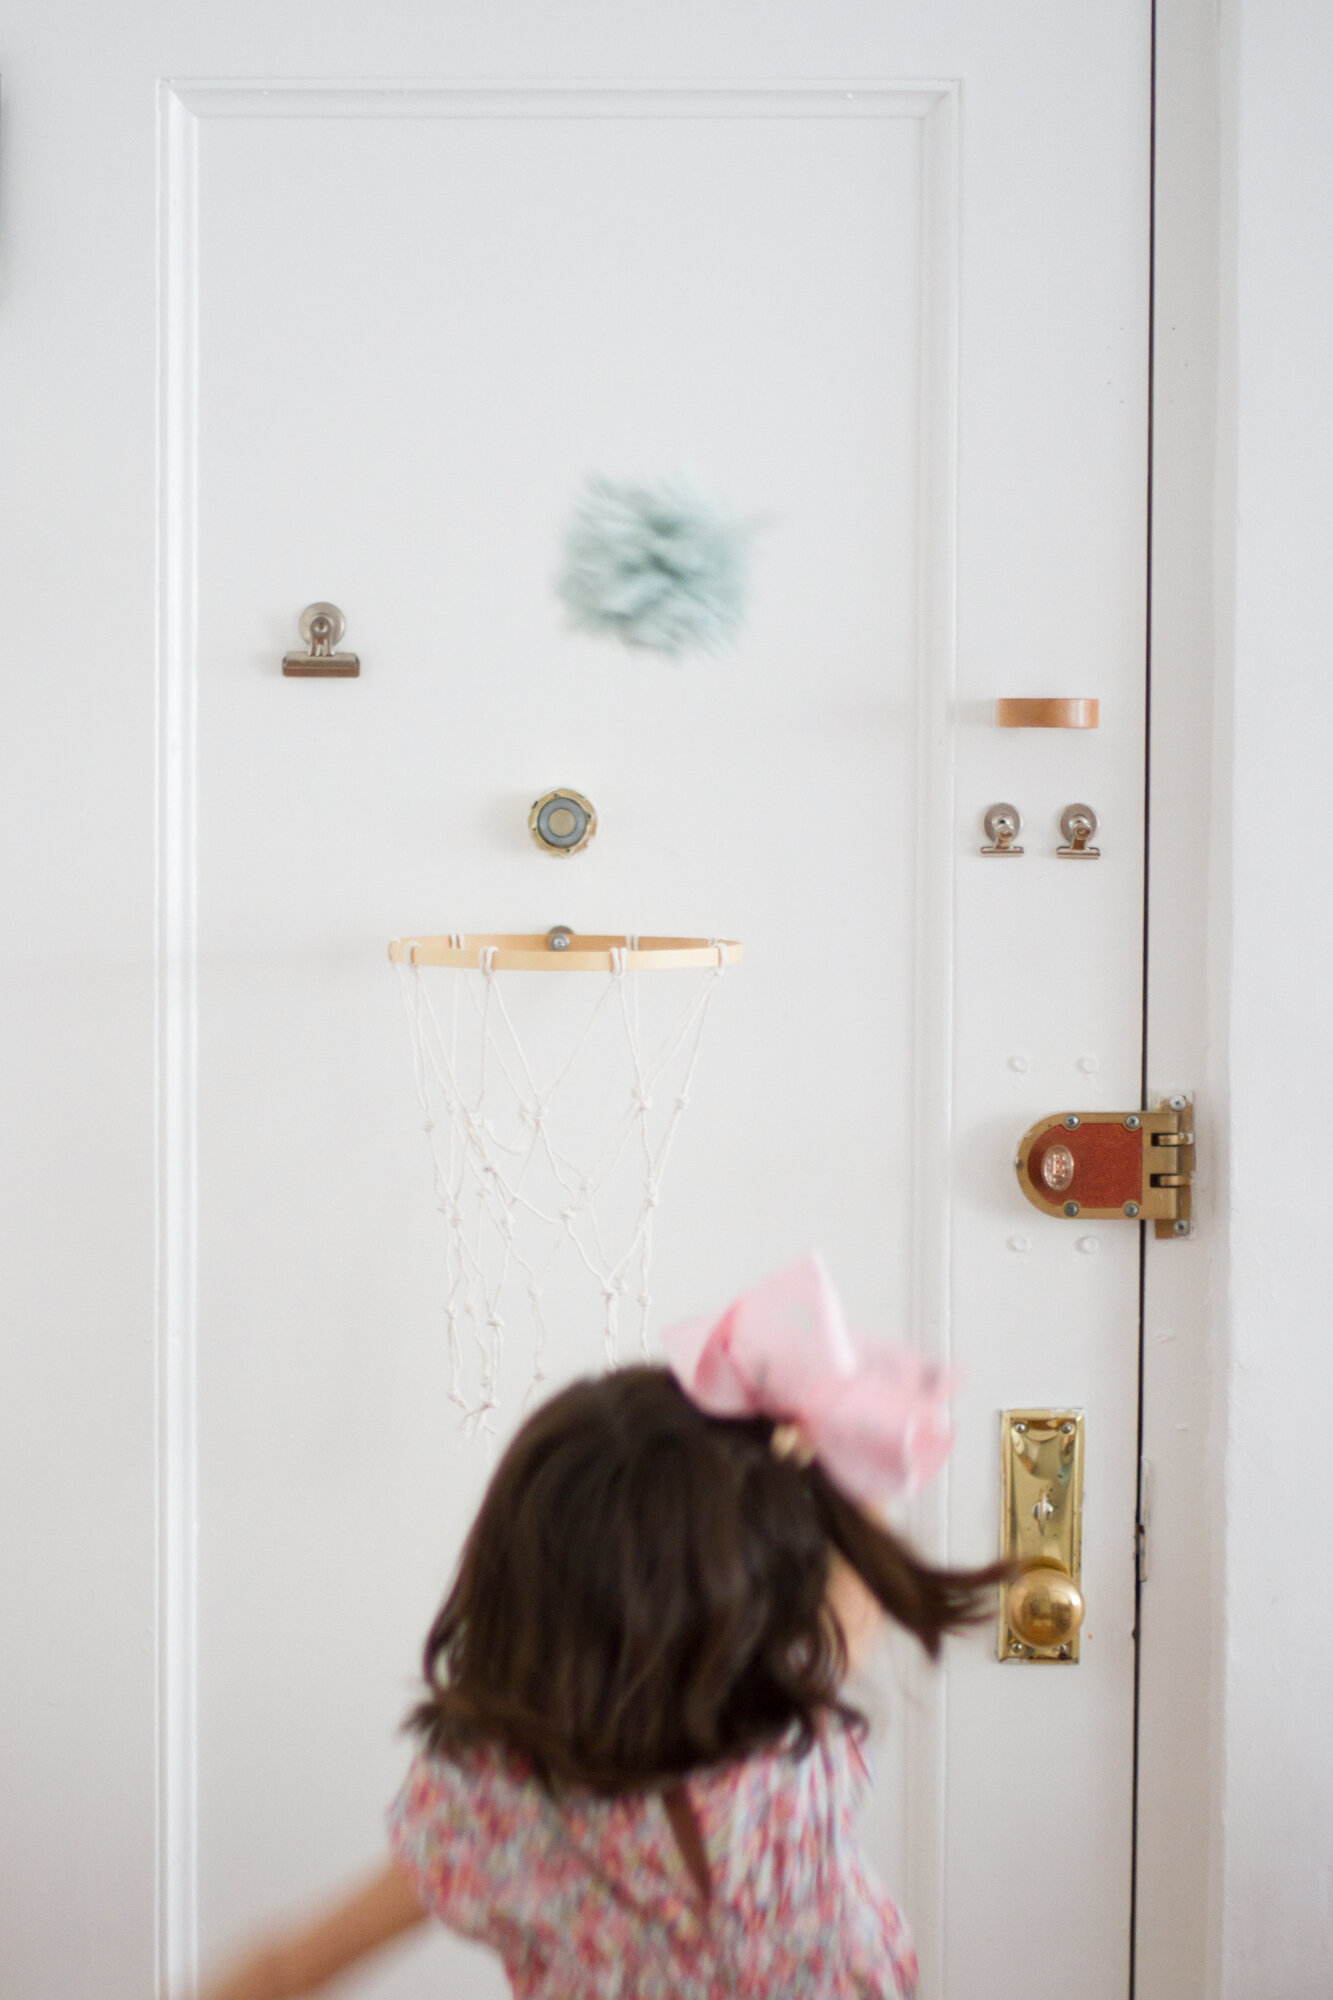
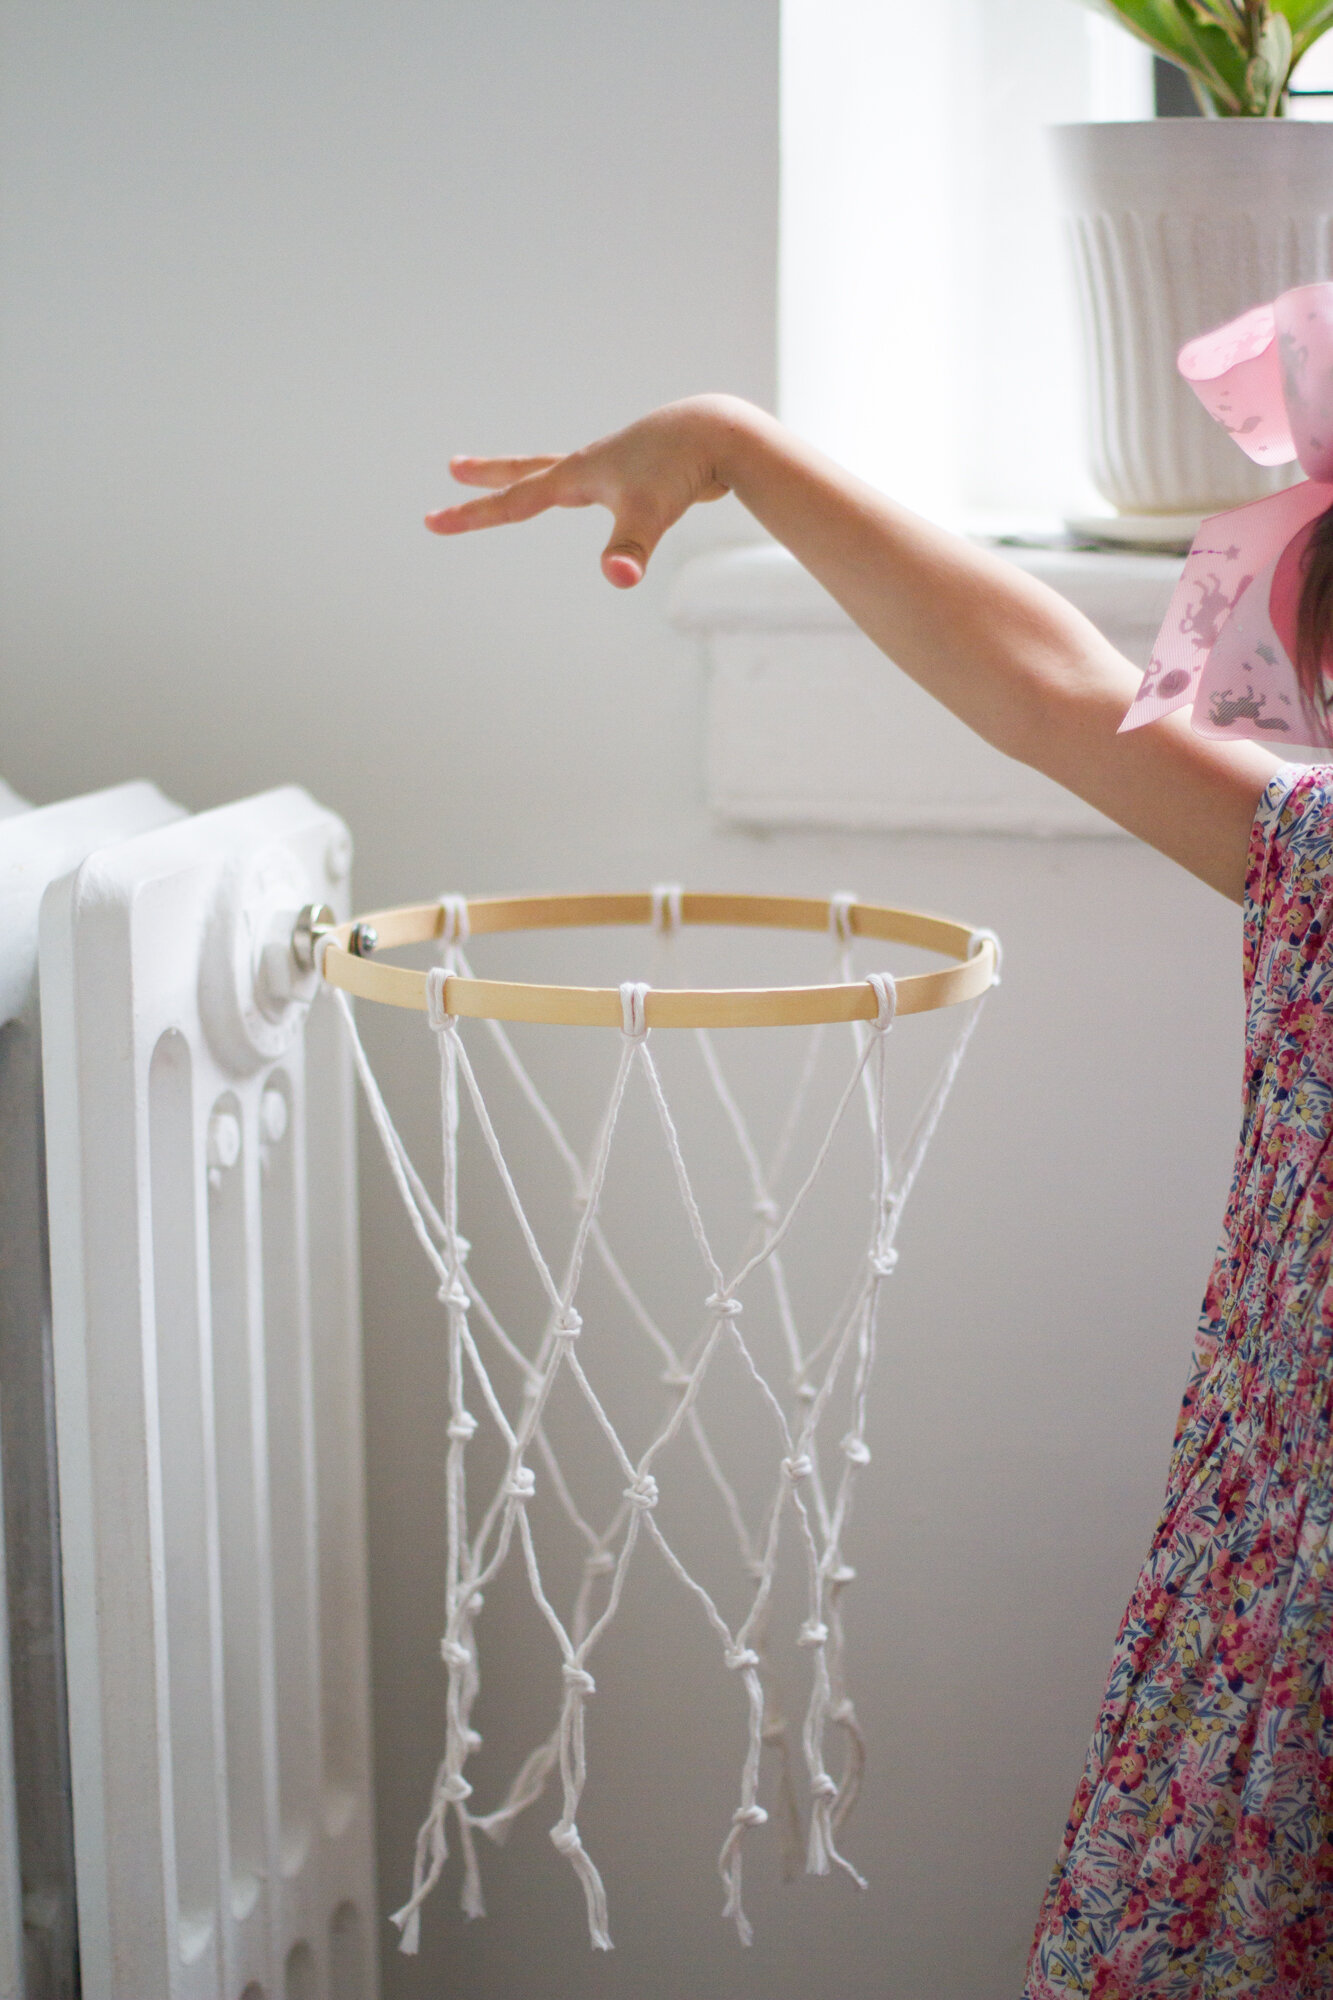
I made an indoor basketball hoop. File that under Things I didn’t Think I’d Be Doing This Spring.
I wasn’t sure I’d write about it because it’s cobbled together from things we had at home, which is the most satisfying kind of project to make but a more frustrating kind of project to be presented with by someone else. Apologies in advance because I can’t offer the exact size of the screw or magnet that I used and my net tying instructions are probably wanting in both detail and technique, but I’ll try my best to show what I did.
I’m hoping you all might take this in the spirit it’s intended, which is an opportunity to dig around in your toolbox for washers and screws and to flex your creativity and make something you’ve never considered before. Mostly I’m hoping this might provide a momentary diversion on days desperate for them.
In terms of a basketball hoop specifically, my goal was to make it movable (and removable) because there are players of varying heights in our apartment and more importantly, because there’s no telling how long the interest might last. I also needed it to be not too much of an eyesore and to actually work. (This replaces another iteration involving rolled up paper and blue painters tape. Believe me when I say it was more than aesthetics alone that were improved in this version.)
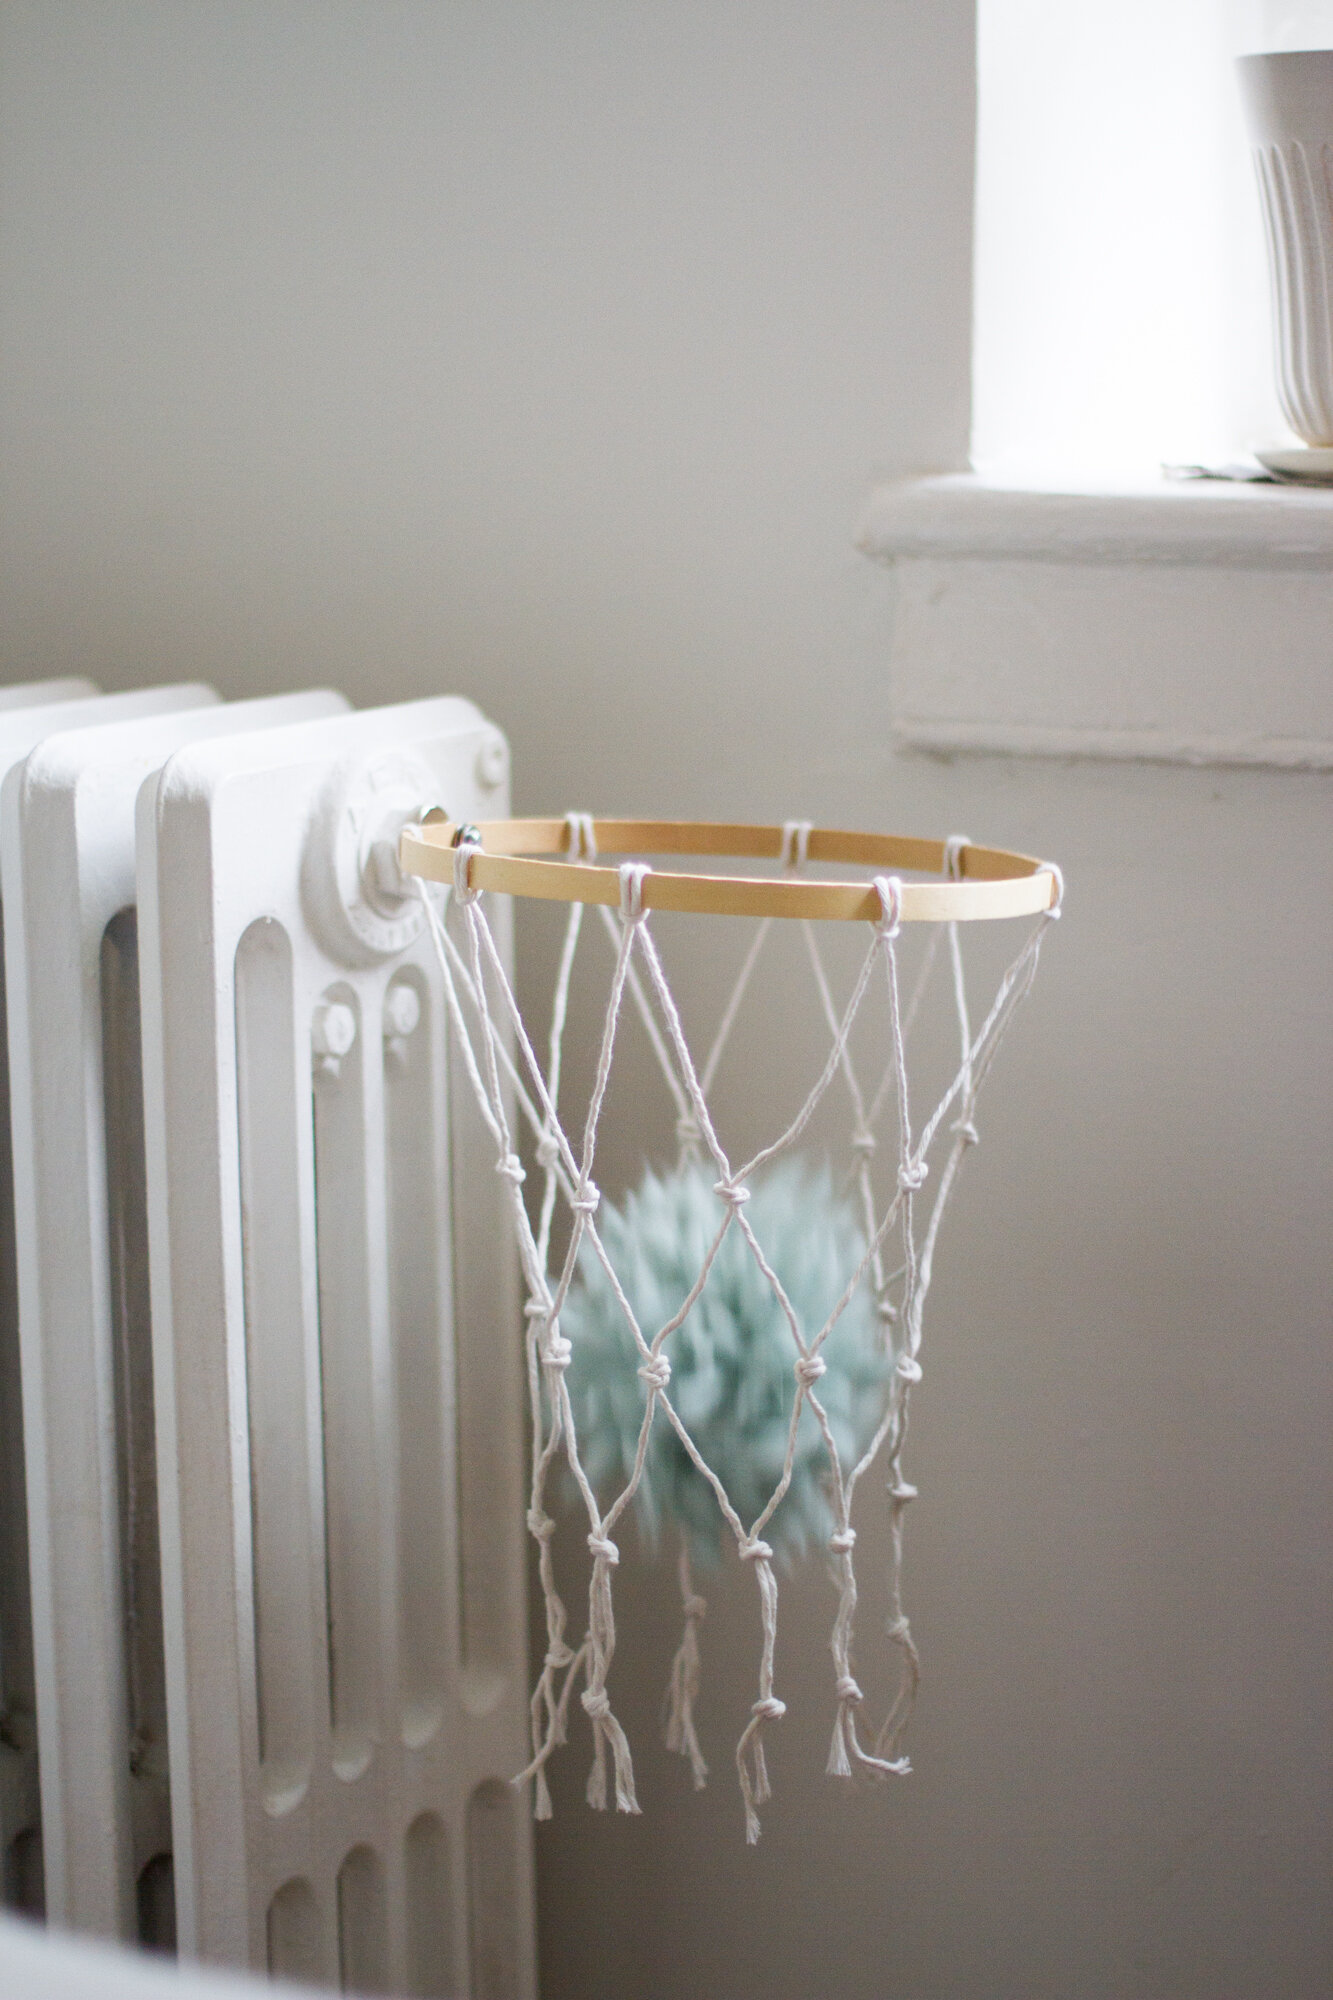
For a ball, we’re using an oversized pom-pom. While it’s quite sturdy when fitted with a heavy-duty magnet, the hoop isn’t strong enough to support an actual basketball. More importantly, neither are our fragile nerves. We needed something that’s virtually noiseless, for ourselves and for our neighbors. We tried a small blow-up beach ball and a woolen knit ball and both worked but the pom-pom has been perfect.
For the net, I modified the macrame technique that Rose taught me last fall and I’ve done my best to offer simple instructions below.
Materials:
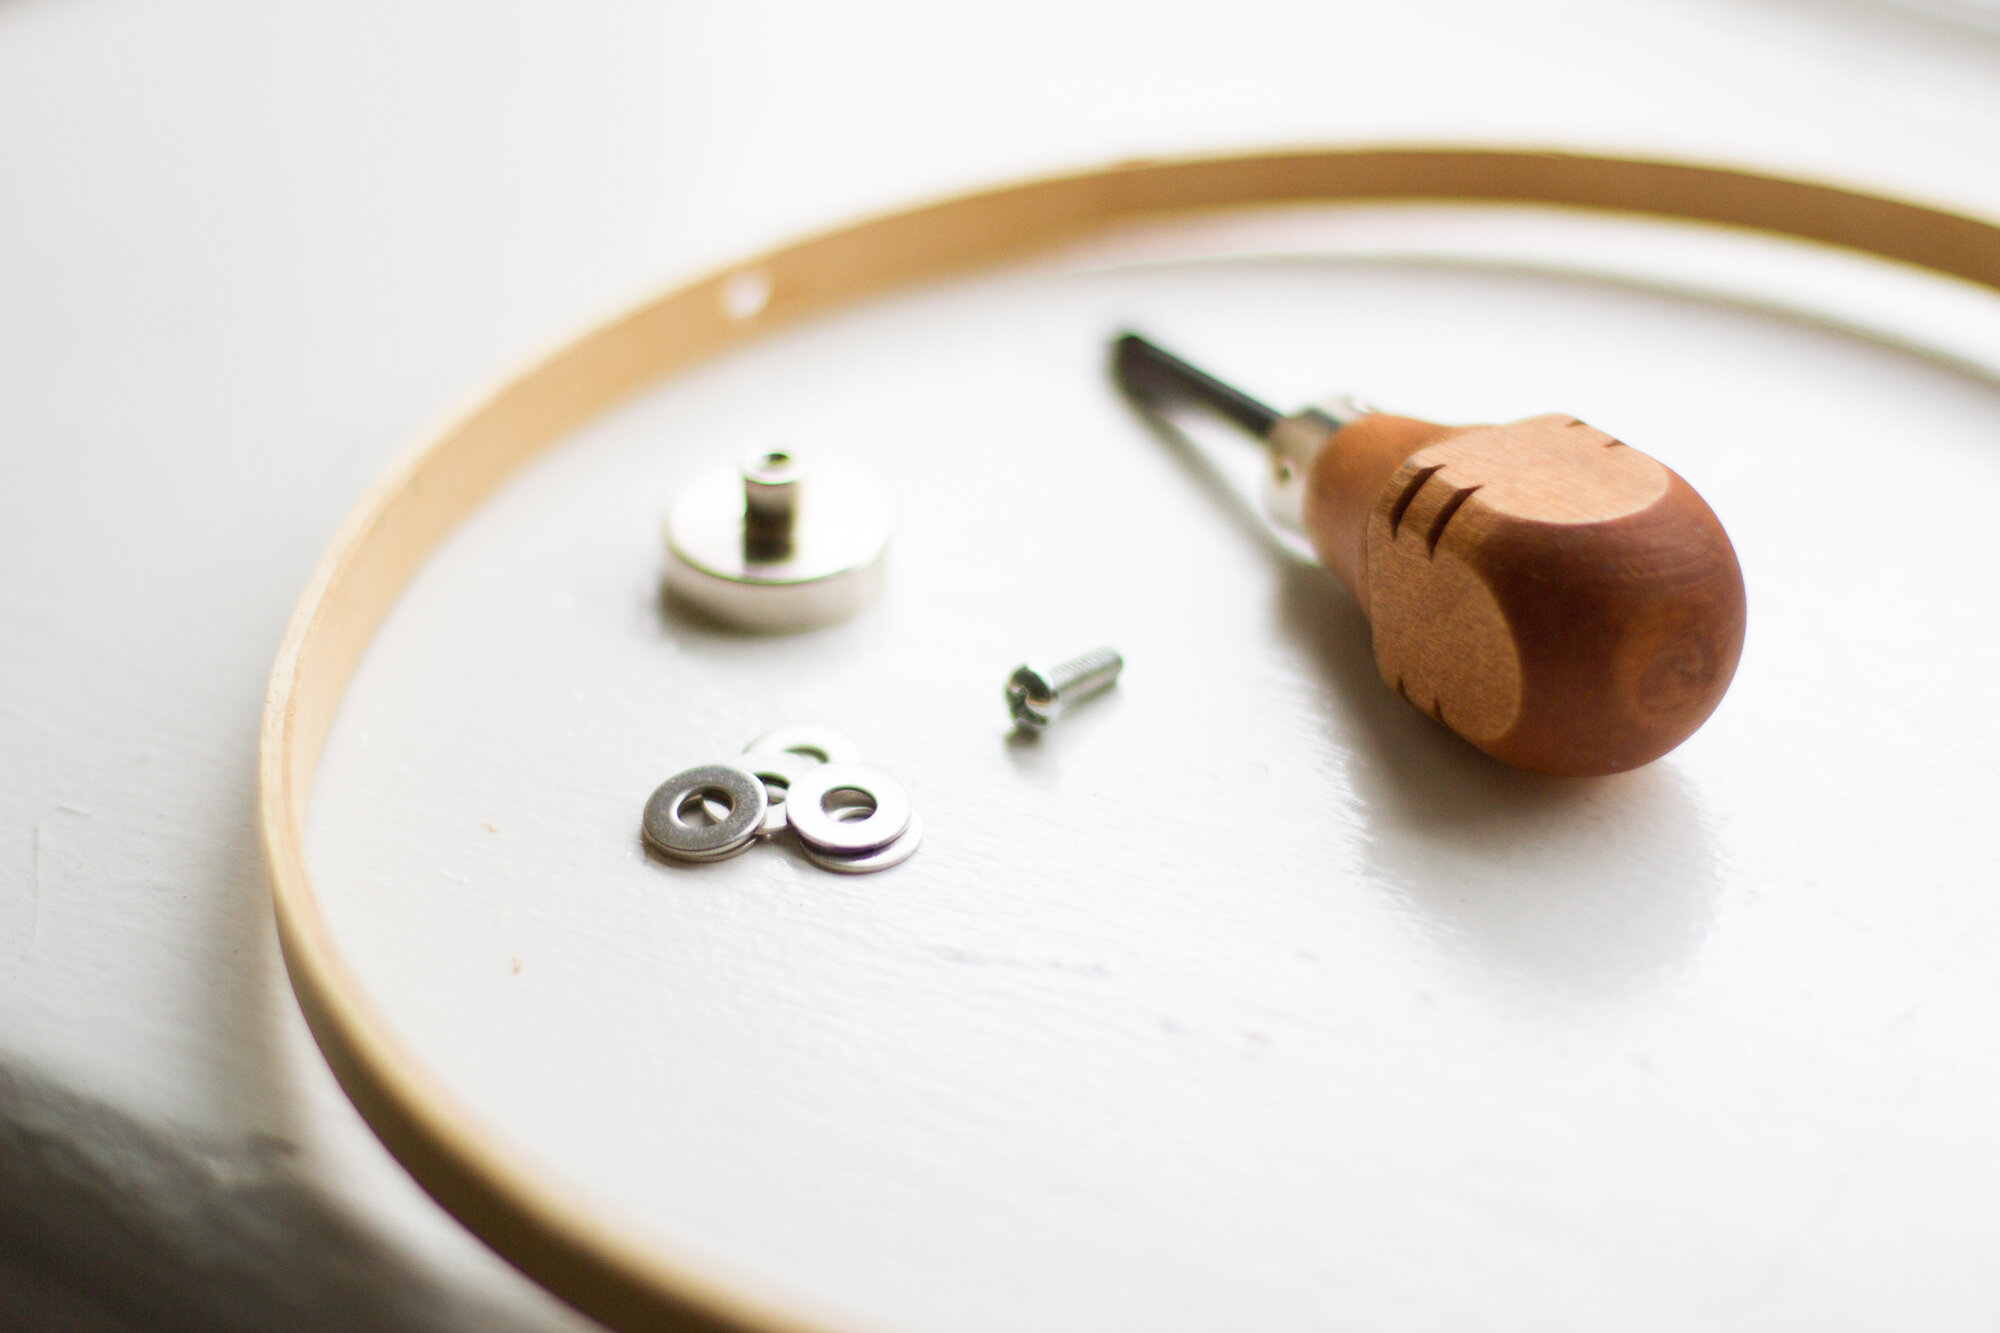
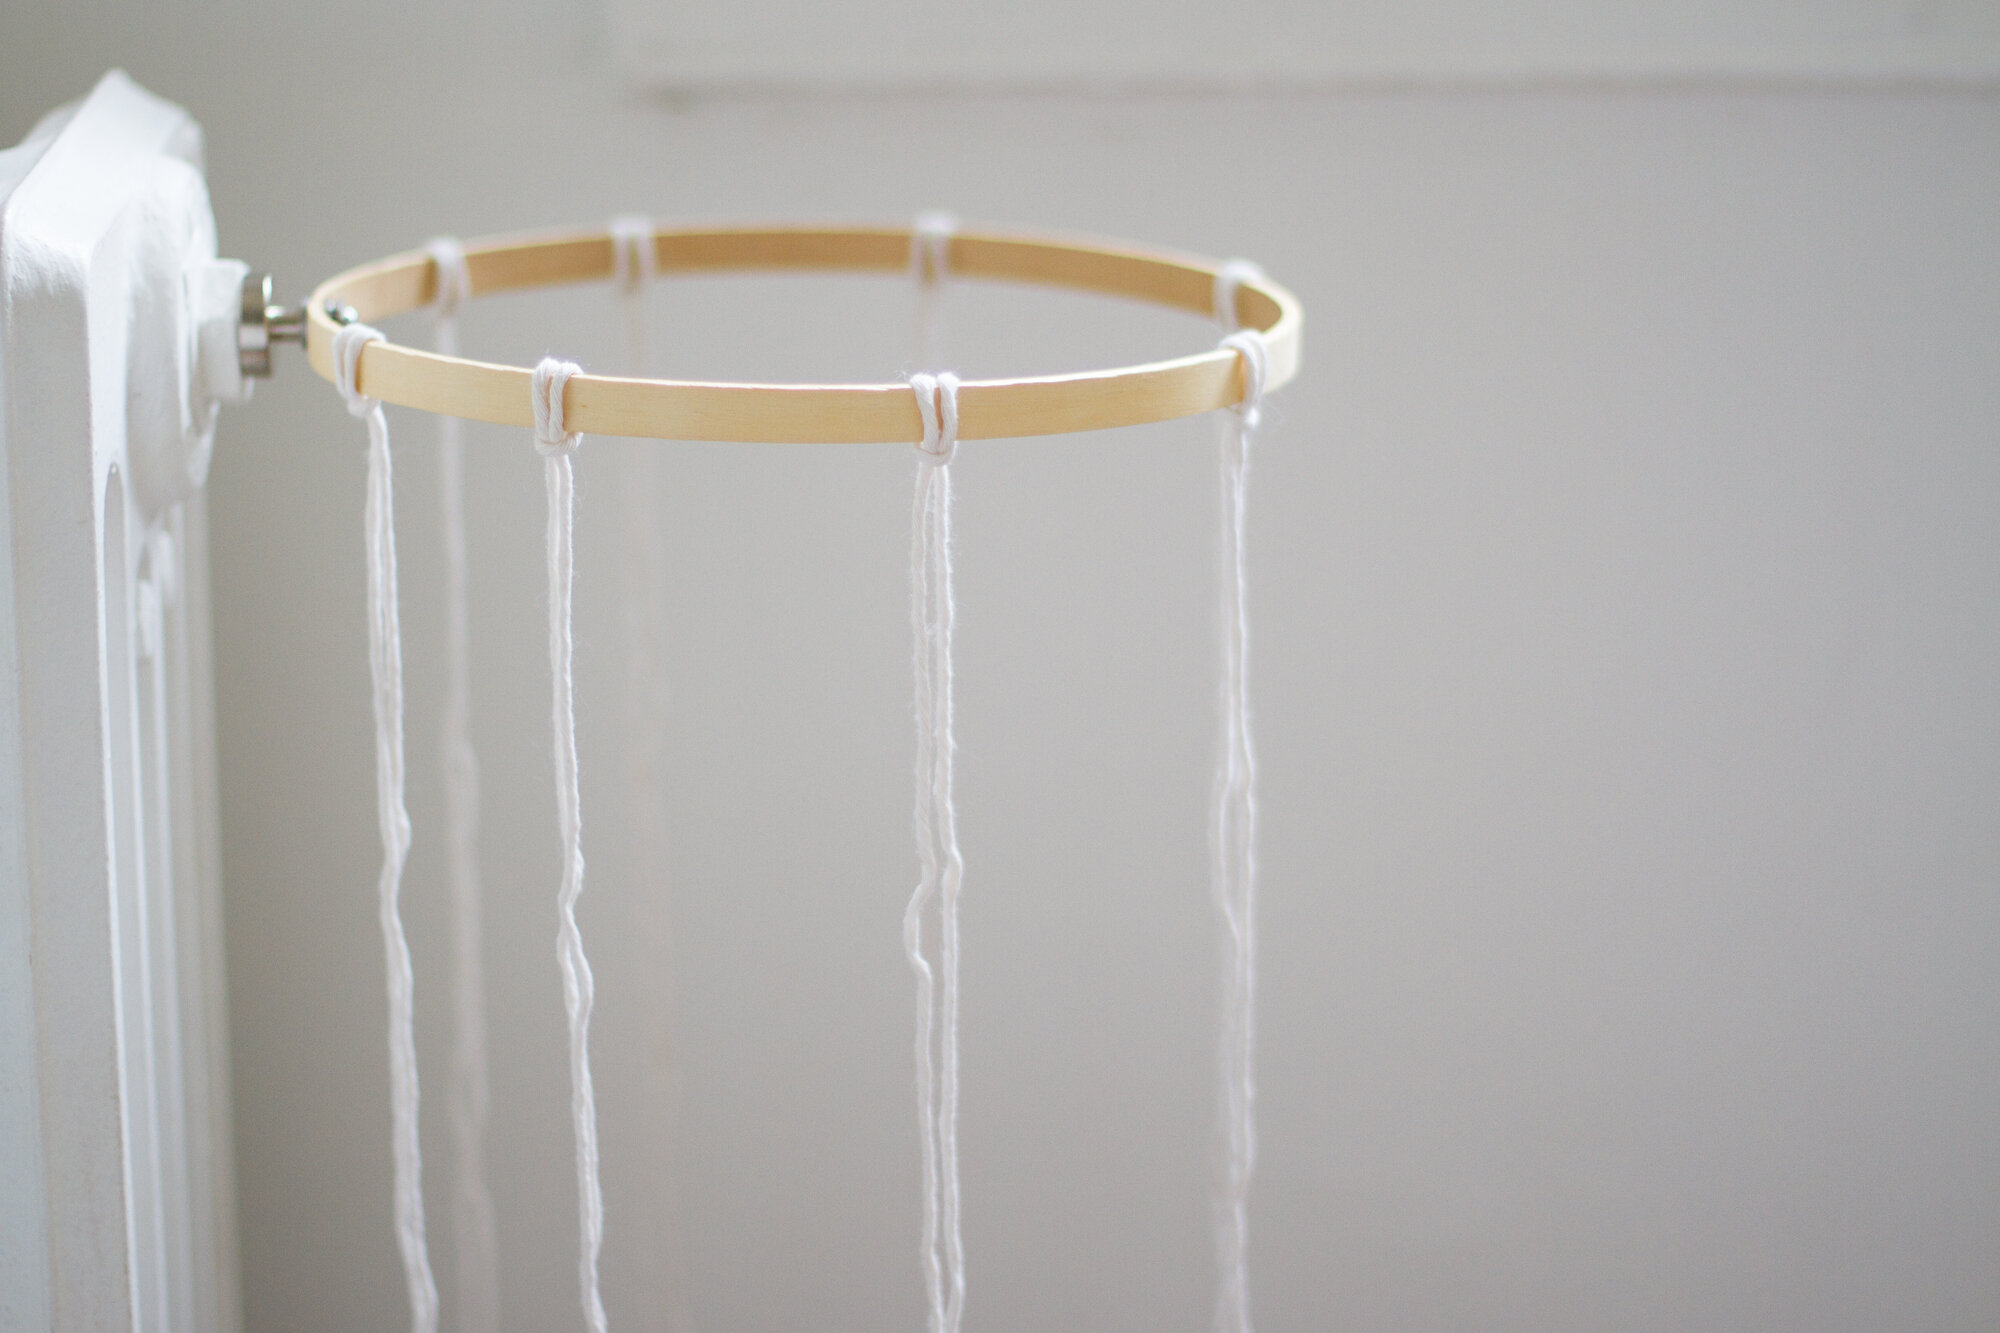
+ The interior ring of a 10-inch wooden embroidery hoop
+ hand drill or electric drill
+ 1 heavy duty magnet hook (the key is having one with a detachable screw hook)
+ screw
+ washers
+ screwdriver
+ cotton butcher’s twine
+ scissors
Directions:
To make the hoop:
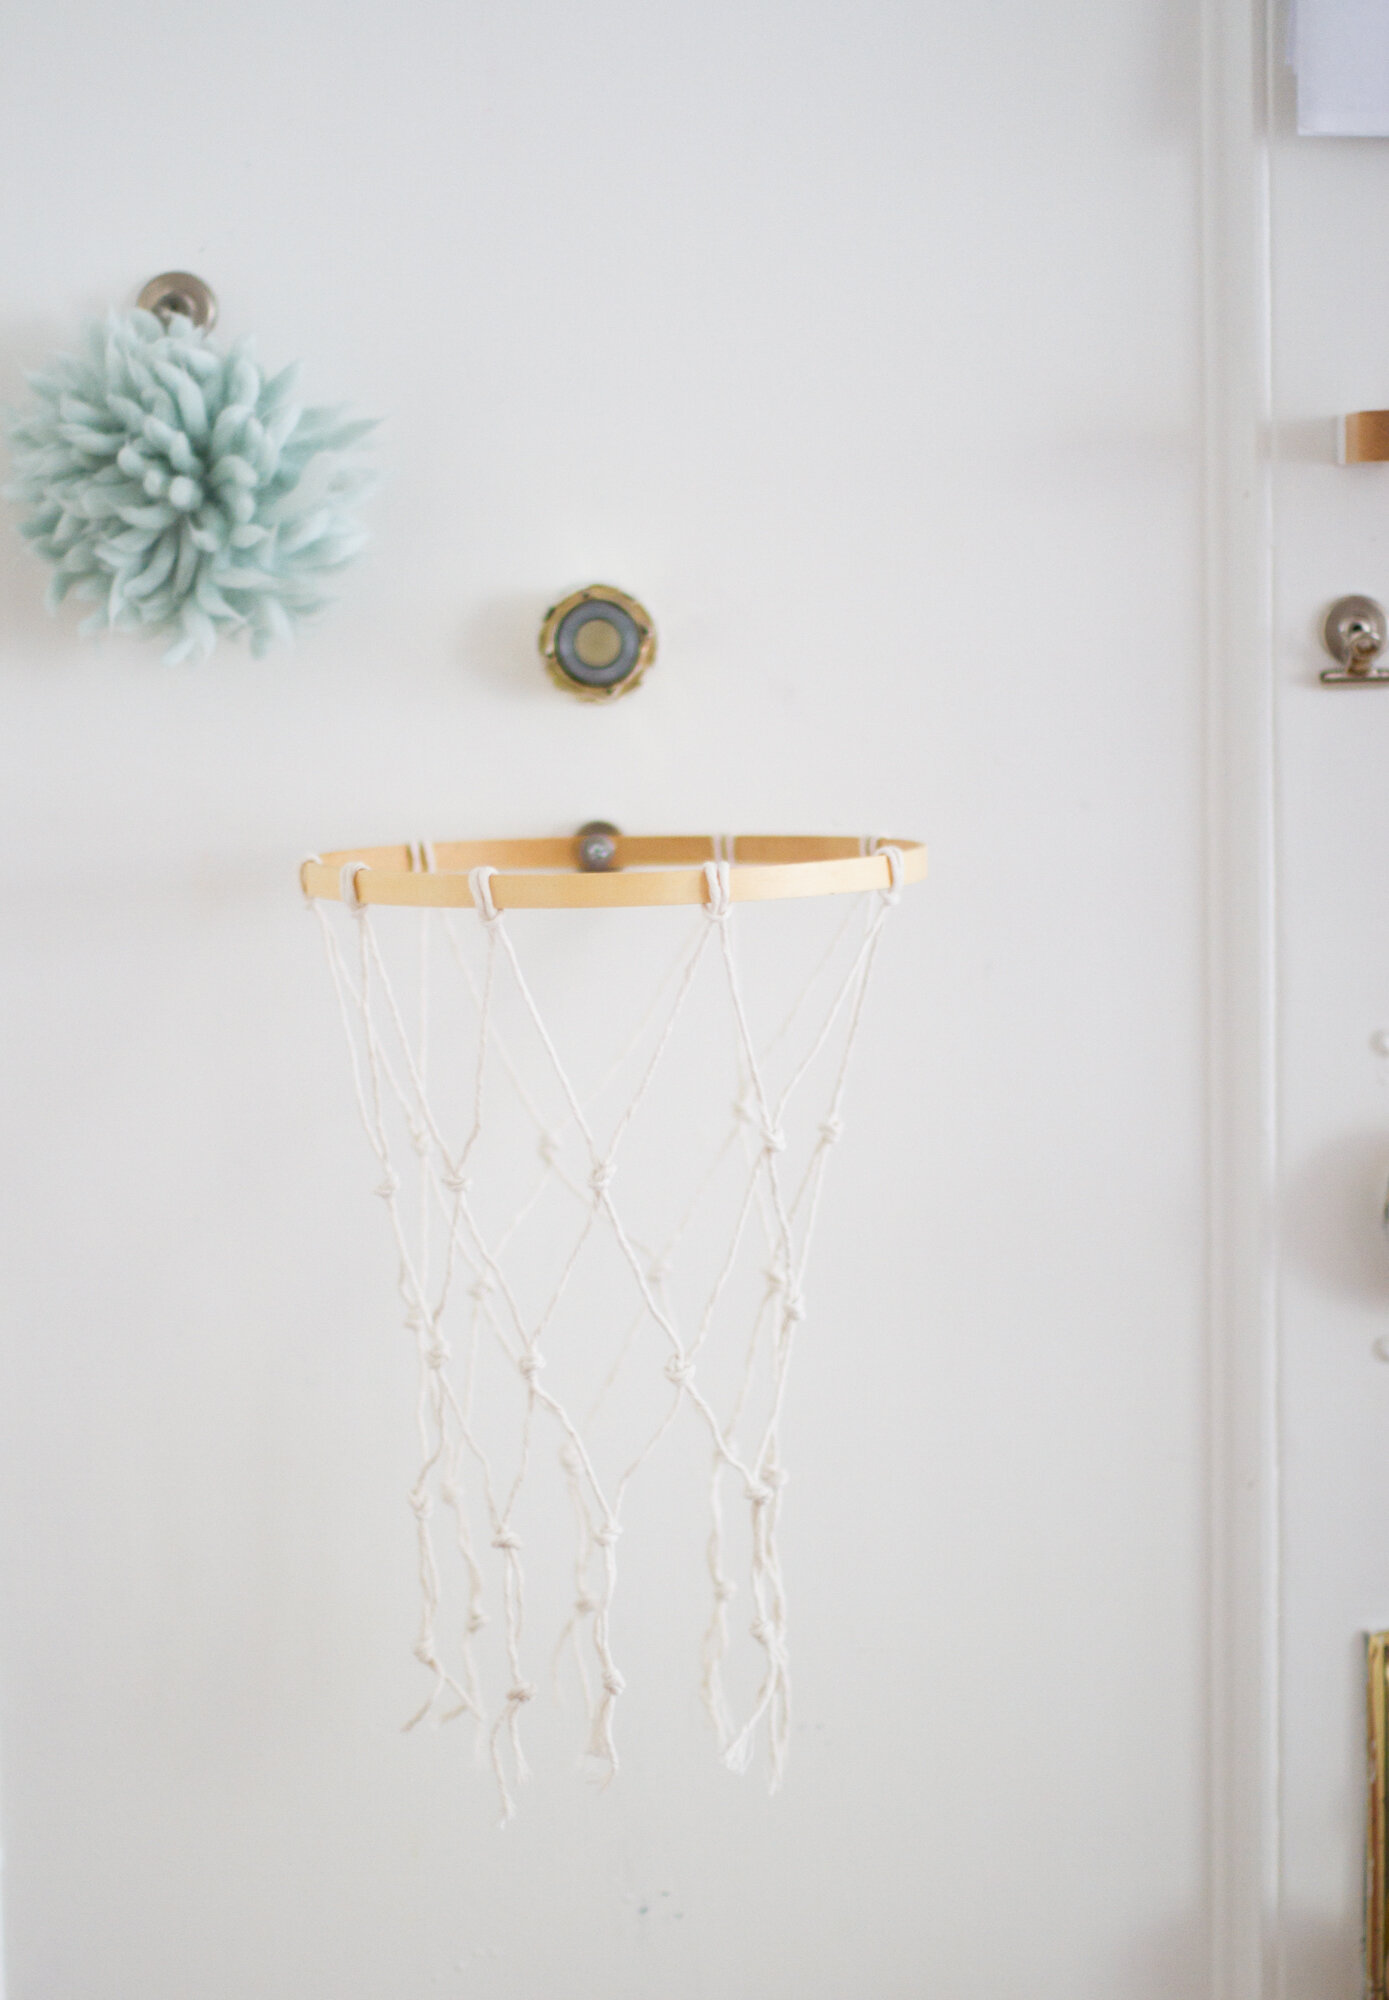
+ Begin by drilling a small hole into the side of your embroidery hoop.
+ Unscrew the hook from the magnet. Fit a screw that matches the width and thread of the hook through the hole in the wooden hoop from the interior of the hoop, so you can screw it into the magnet post on the other side. Depending on the size of your magnet and hoop, you might need to use a series of washers, as I did, to help secure a tight fit.
To make the net:
+ Begin by attaching the hoop to a magnetic surface, like a steel apartment door, refrigerator, or radiator.
+ Cut 8 ~4′ lengths of cotton butcher’s twine.
+ Fold each piece of string in half. Place the folded loop over the top of the hoop. Loop the ends of the string through the hole you formed and pull, forming the cast on stitch. Repeat for the remaining strings, placing them at even intervals around the circumference of the hoop.
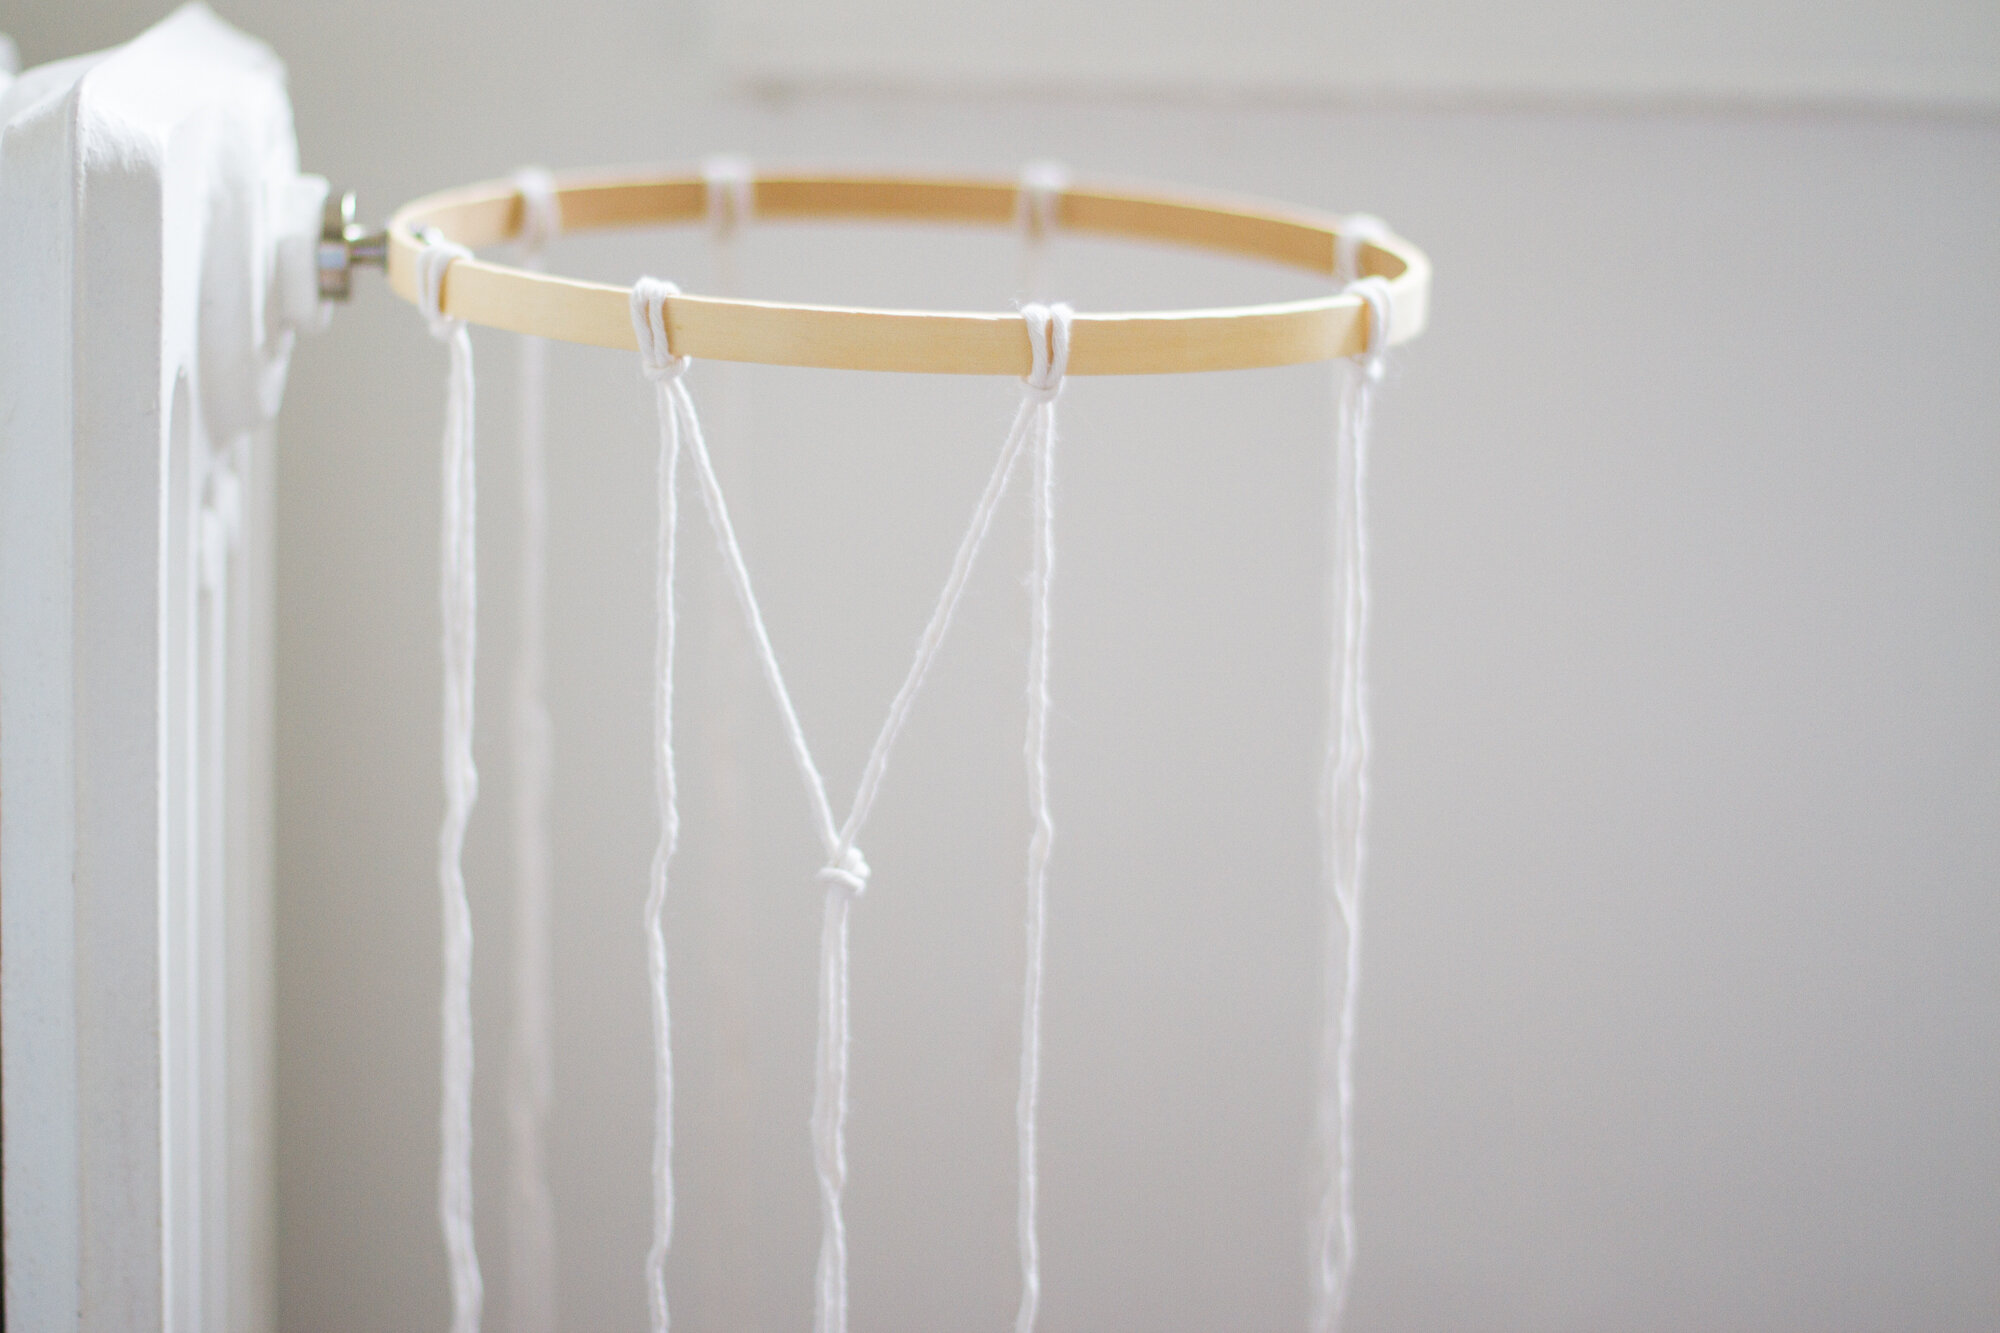
+ Take the left-hand string hanging from one loop and the right-hand string hanging from the adjacent loop and pull them together to form the point of a triangle, roughly 3 inches down from the hoop. Tie a simple knot by looping both strings through each other.
+ Repeat around the circumference of the hoop until all of the strings are tied.

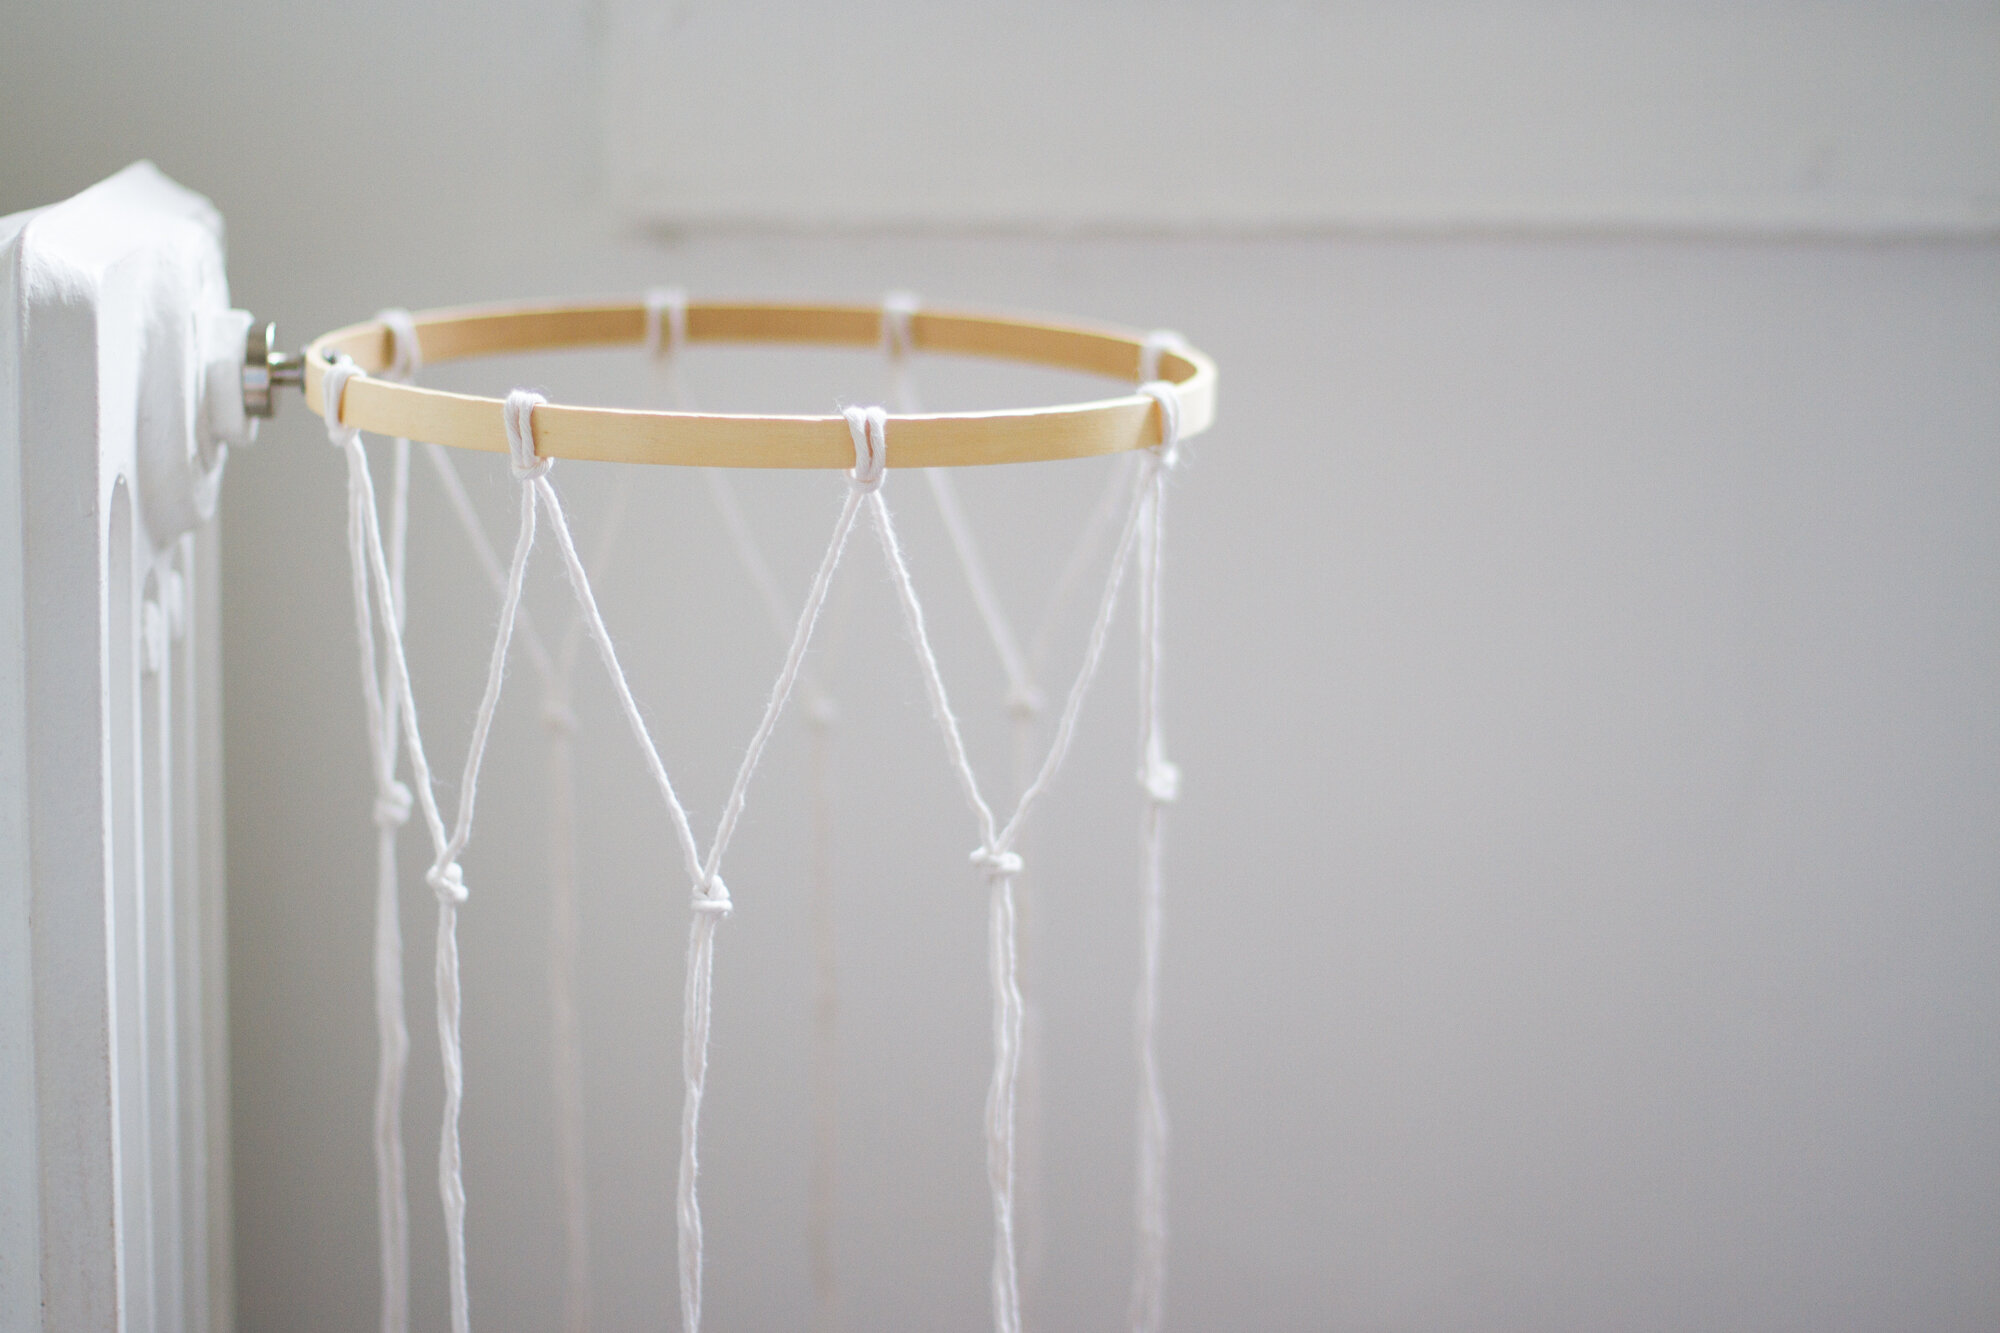
+ To make a second row, follow the same technique as above. This time, your knots will be forming the bottom point of a diamond. Tie your knots roughly 2 inches down from the previous knot. This will allow your net to begin to taper a bit. Repeat until all of the strings are tied. You’ll now have two rows of knots, forming large diamonds around the hoop.
+ To make a third row, follow the same technique as above. This time, form the bottom point of the diamond about 1.5 inches down from the last row of knots.
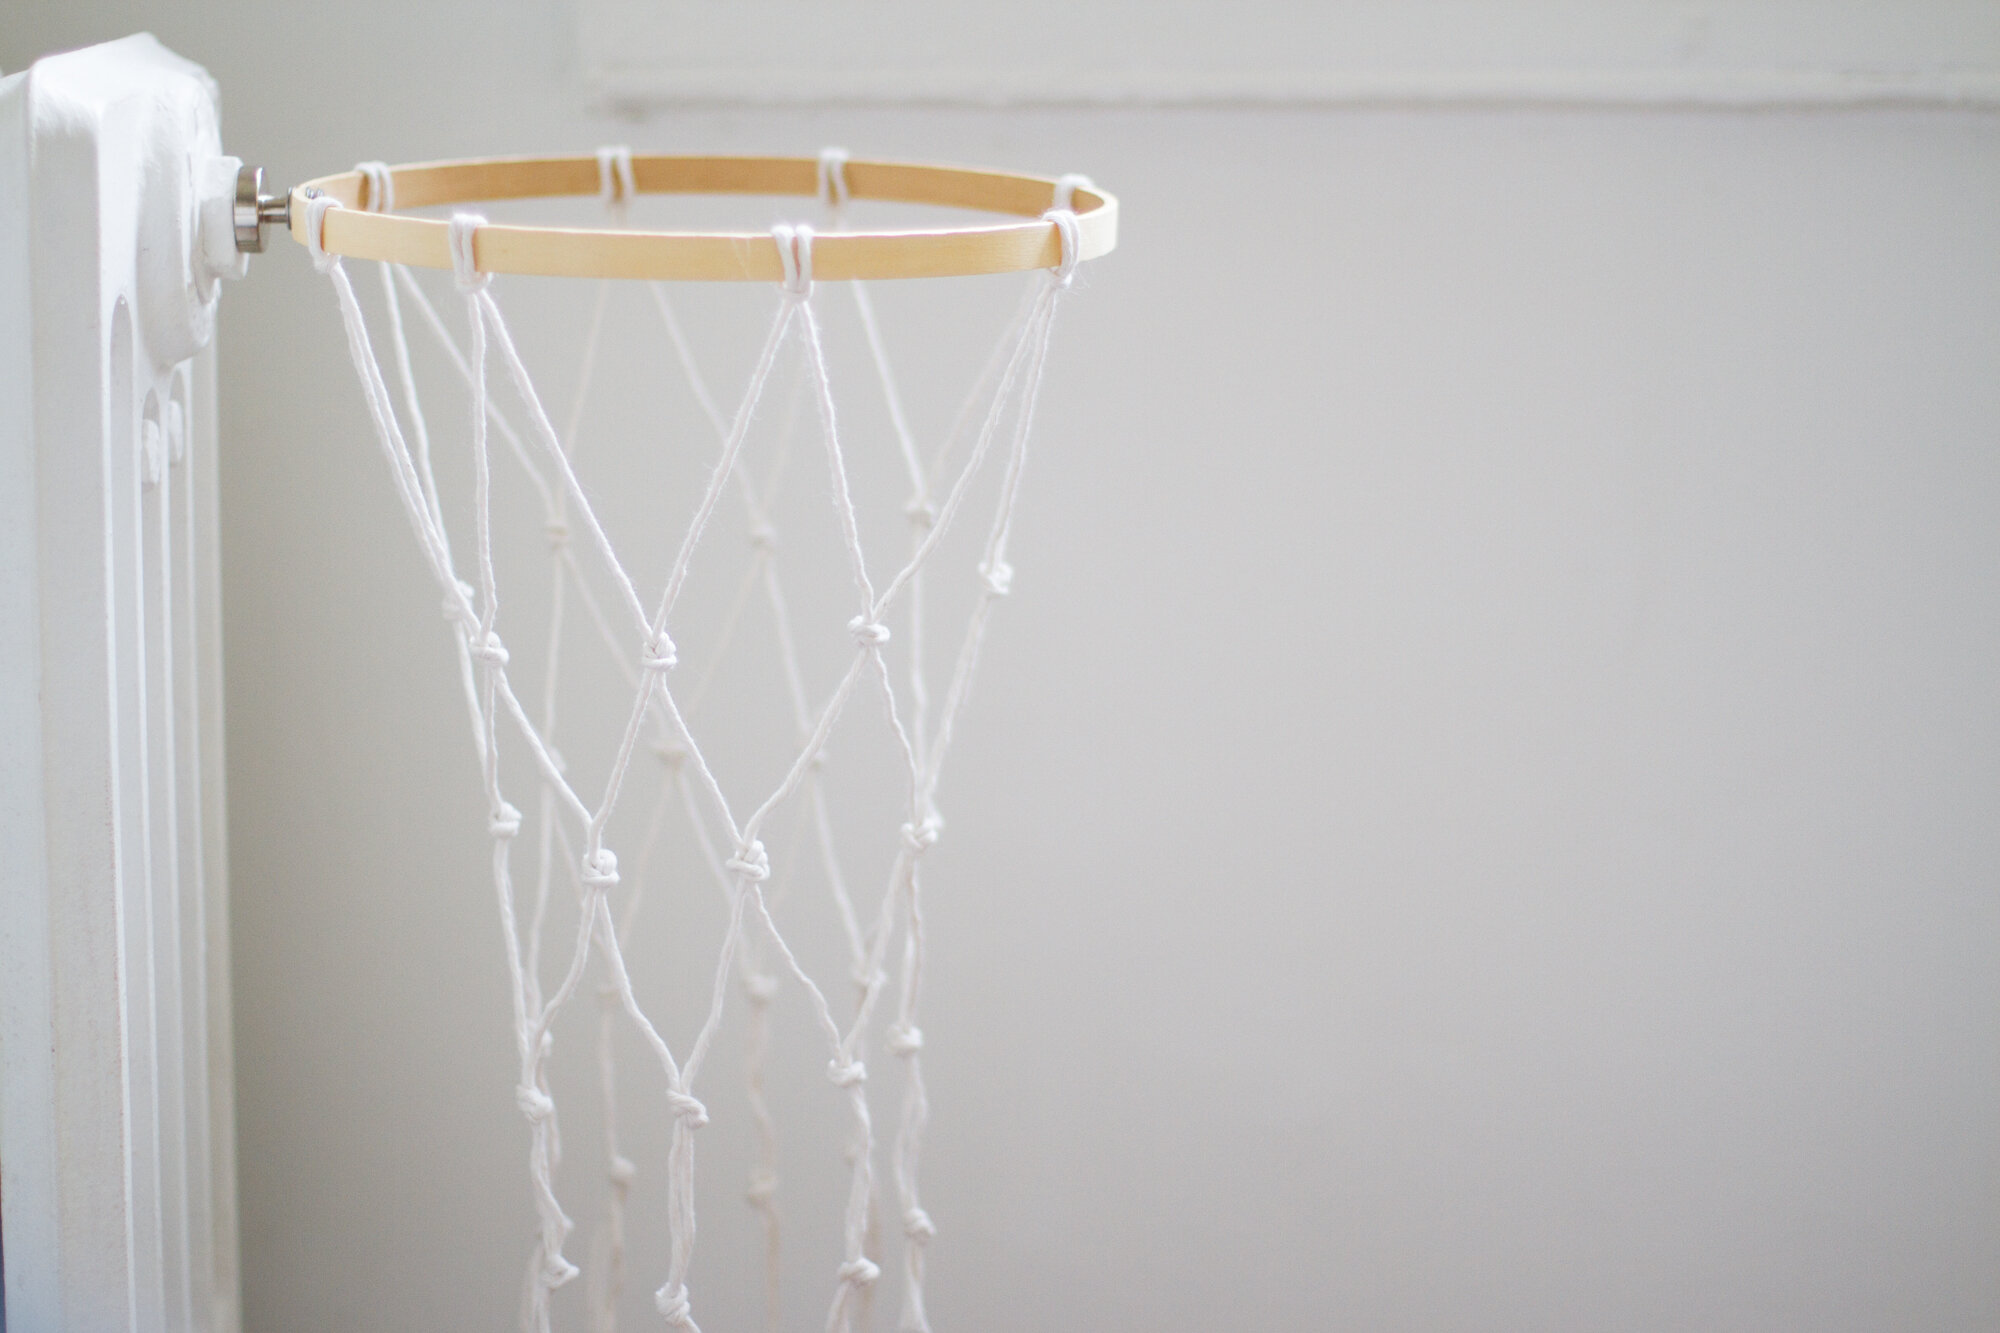
+ To finish, tie an additional final knot in the bottom of each set of strings, about an inch directly down from the last knot you tied. (You’re not pairing strings from different sides this time.) Trim any excess length.
Notes!
+ Wooden embroidery hoops are quite thin and I didn’t have any trouble using a small hand drill to make my hole, but because of the relatively fragile wood, take care not to split the hoop with too large a hole.
+ I attached my hoop to our steel apartment door with a magnet, but you could also place on your refrigerator or another magnetic surface. If your home is fitted with metal corner beads (the metal piece used to form sharp corners with drywall) and your magnet is very heavy duty, you might even be able to attach the hoop to a door frame.
And that’s that. If you make one of your own, I’d love to see photos. If you have more ideas for quiet gross motor play for small apartments, I’m ALL ears.
8 Comments
When my kids were little and we were stuck inside on a rainy day I would take out cookie sheets or lay an oilcloth on the table and spray a whole bunch of shaving cream on it. They ran toy cars through, gave their dolls a wash, drew letters- endless fun! Hang in there, these are some trying times.
We did that aallll the time as kids. Very frequently ended up covered in the stuff (think mohawks, mustaches and fake muscles) but it was a blast!
I can solidly attest that shaving cream on cookie sheets will buy you a solid chunk of quiet indoor entertainment with minimal mess. We actually started out doing food dye and shaving cream art prints (a quick google should find a good video reference) and that turned into foam play. The food dye will obviously make things a bit messier but I appreciated a cheap 2-for-1 activity. Another option would be shaving cream in a bathtub or outside.
We’ve been playing indoor “soccer” and “baseball” with a dayglow shower puff left behind, unused, after a relatives visit. Couldn’t bring myself to throw it away or use it. It’s been the perfect soft and silent ball. Bounces nicely off the TV with no harm too! Just keep an eye on the wine glasses. Climbing on and off kitchen chairs and moving from one to another has also provided minutes of entertainment!
perfect!
I was once restricted to a hotel suite with two toddlers. We could not venture outside b/c a wildfire was nearby and the air quality was poor. I utilized every chair, stool, pillow, and the coffee table to make an obstacle course. The wood floor was hot lava and you had to climb over the sofa and on to the table and then on to the stool and so on and so forth, being sure to land on the bath mat as protection from the lava. After about 30 minutes of this frantic fun, both tykes were able to settle in for an hour or so of reading before they built the next course with all kinds of vigor and imagination.
Quand esthétique et fonctionnalité convergent …. bravo ! Circuit de dominos avec un jeu de Jenga.
Glad you’re all well.
Love this! I used your inspiration and made a similar one with my three year old today. We didn’t have a magnetic hook, and don’t have too many magnetic surfaces around, but a sturdy Command hook worked just fine. Thank you for sharing!
Comments are moderated.