
When Rose first made these simple canvas wall caddies, I knew we were going to have do a little advent calendar variation. Sure enough, as soon as we first shared the project, readers wrote in asking for guidance on how to tweak the design to account for twenty-four little pockets and, crucially, some chocolate.
Rose—an advent newbie—generously took on the task. Her approach with this advent calendar caddy is the same as with the other canvas caddies she designed—simplifying the sewing and leaving raw edges for ease and speed.
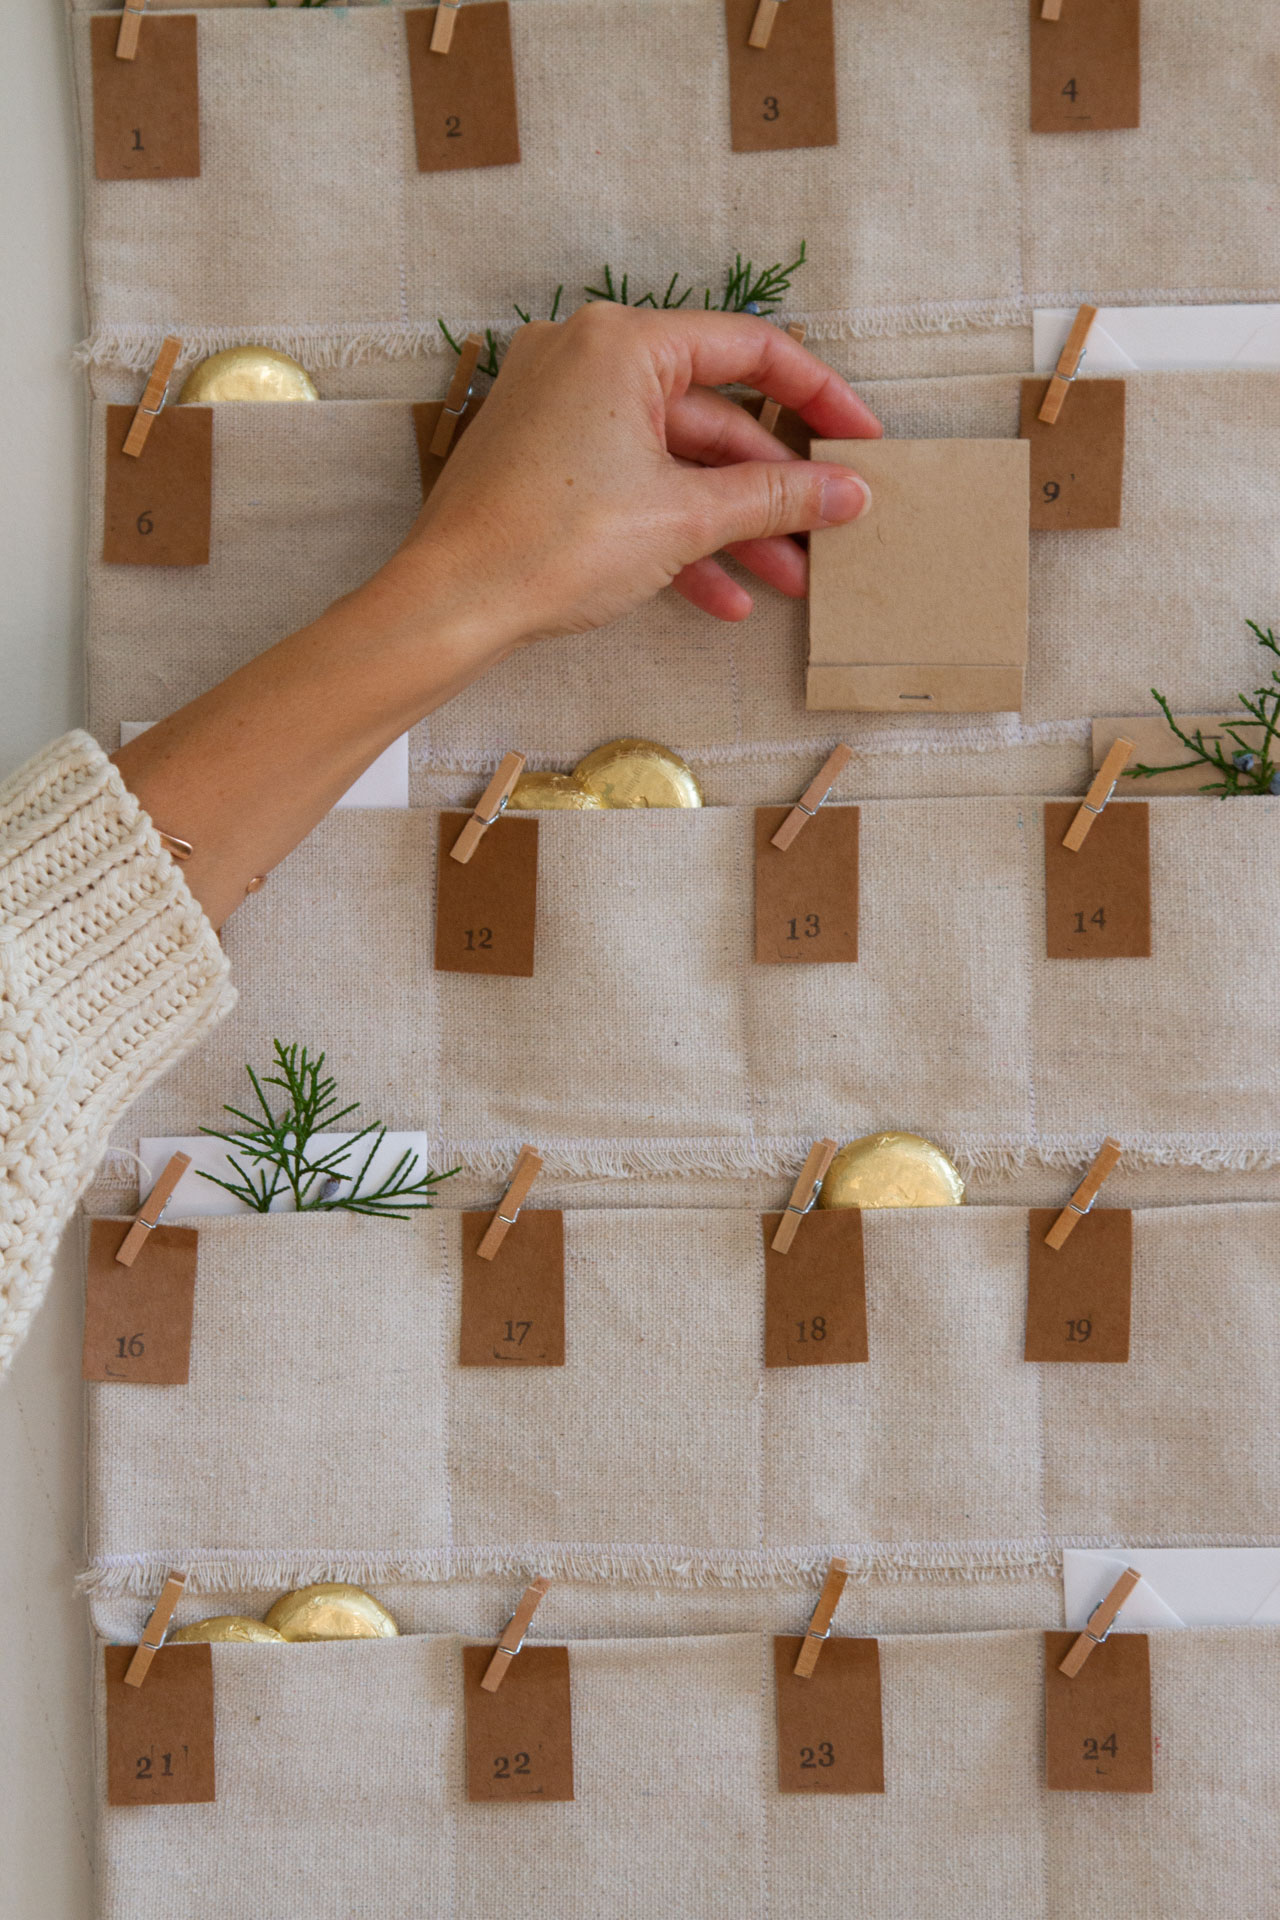
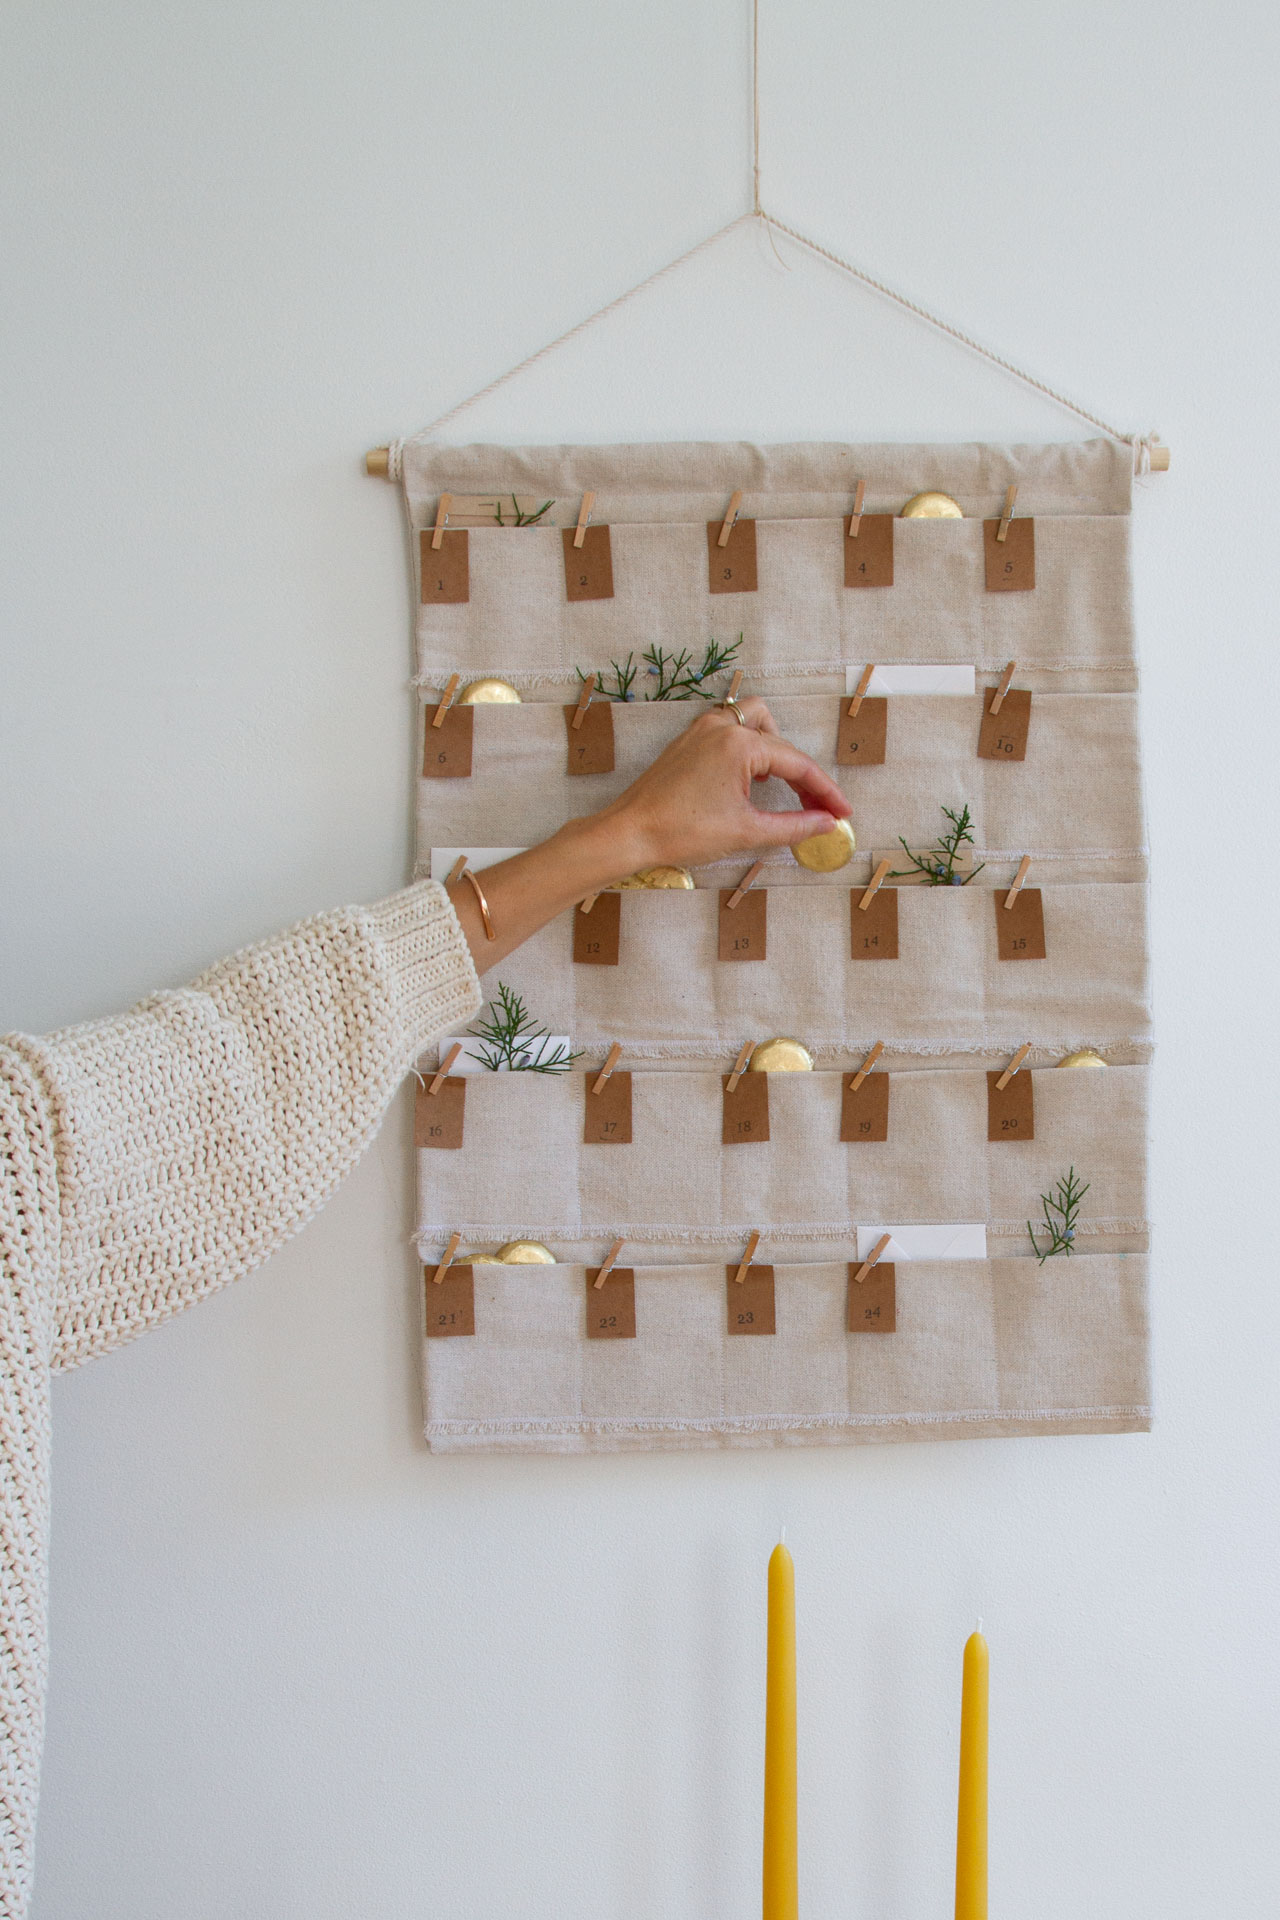
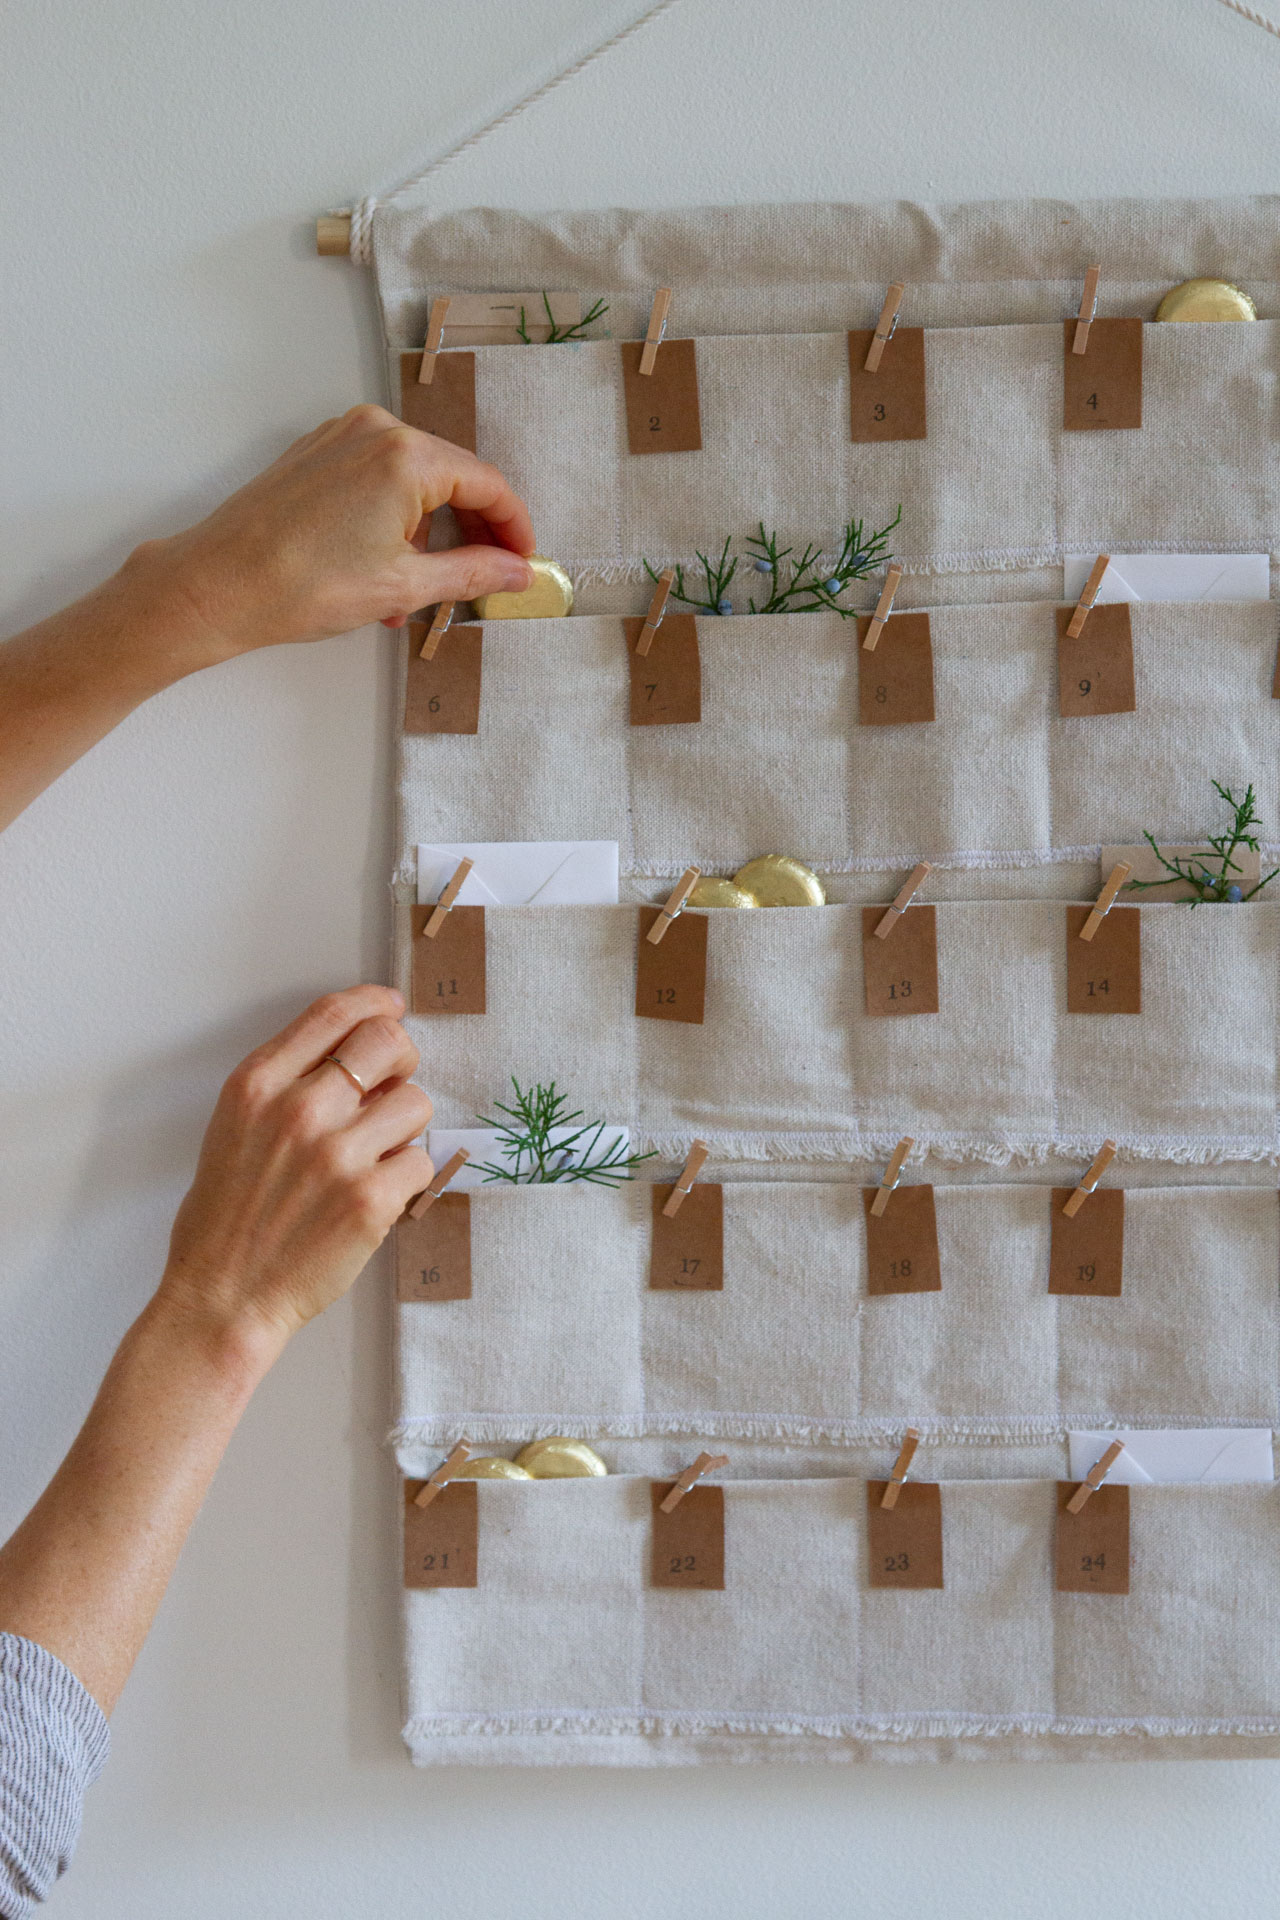
I like to keep my advent traditions heavy on the little activities and lighter on the little gifties, so in past years, paper envelopes for my calendars were perfect. This design keeps things just as minimal, but the cloth pockets here are forgiving in ways that paper envelopes just aren’t. On some days my kids might open a tinyhandmade envelope prepared with a festive holiday activity, or a peace and justice centered suggestion, but for busy days or tired days or days when we just need a sweet treat, these slim pockets are also roomy enough to stuff in three little chocolates and call it done. (Should the craft bug bite, they’re also ideal for slipping in mini matchbook sketchpads or tiny cardboard monsters.)
Rose and I both tend toward understated, so we’ve left the calendar plain and simple, but it’s endlessly customizable should you like to go a different route in terms of fabric or adornment. (If you attach paper numbers with clips like we did, you could even use this for something else during the first eleven months of the year.)
Here are the full instructions from Rose:
Materials:
+ 1 yard of cotton canvas or drop cloth
+ sewing machine
+ sewing thread
+ 1/2″ diameter wooden dowel; 18 inches long
+ straight pins
+ 20” piece of string or twine
+ tape measure/ruler
+ scissors
+ 25 mini wooden clothespins
+ paper/pen and or number stamps
Instructions:
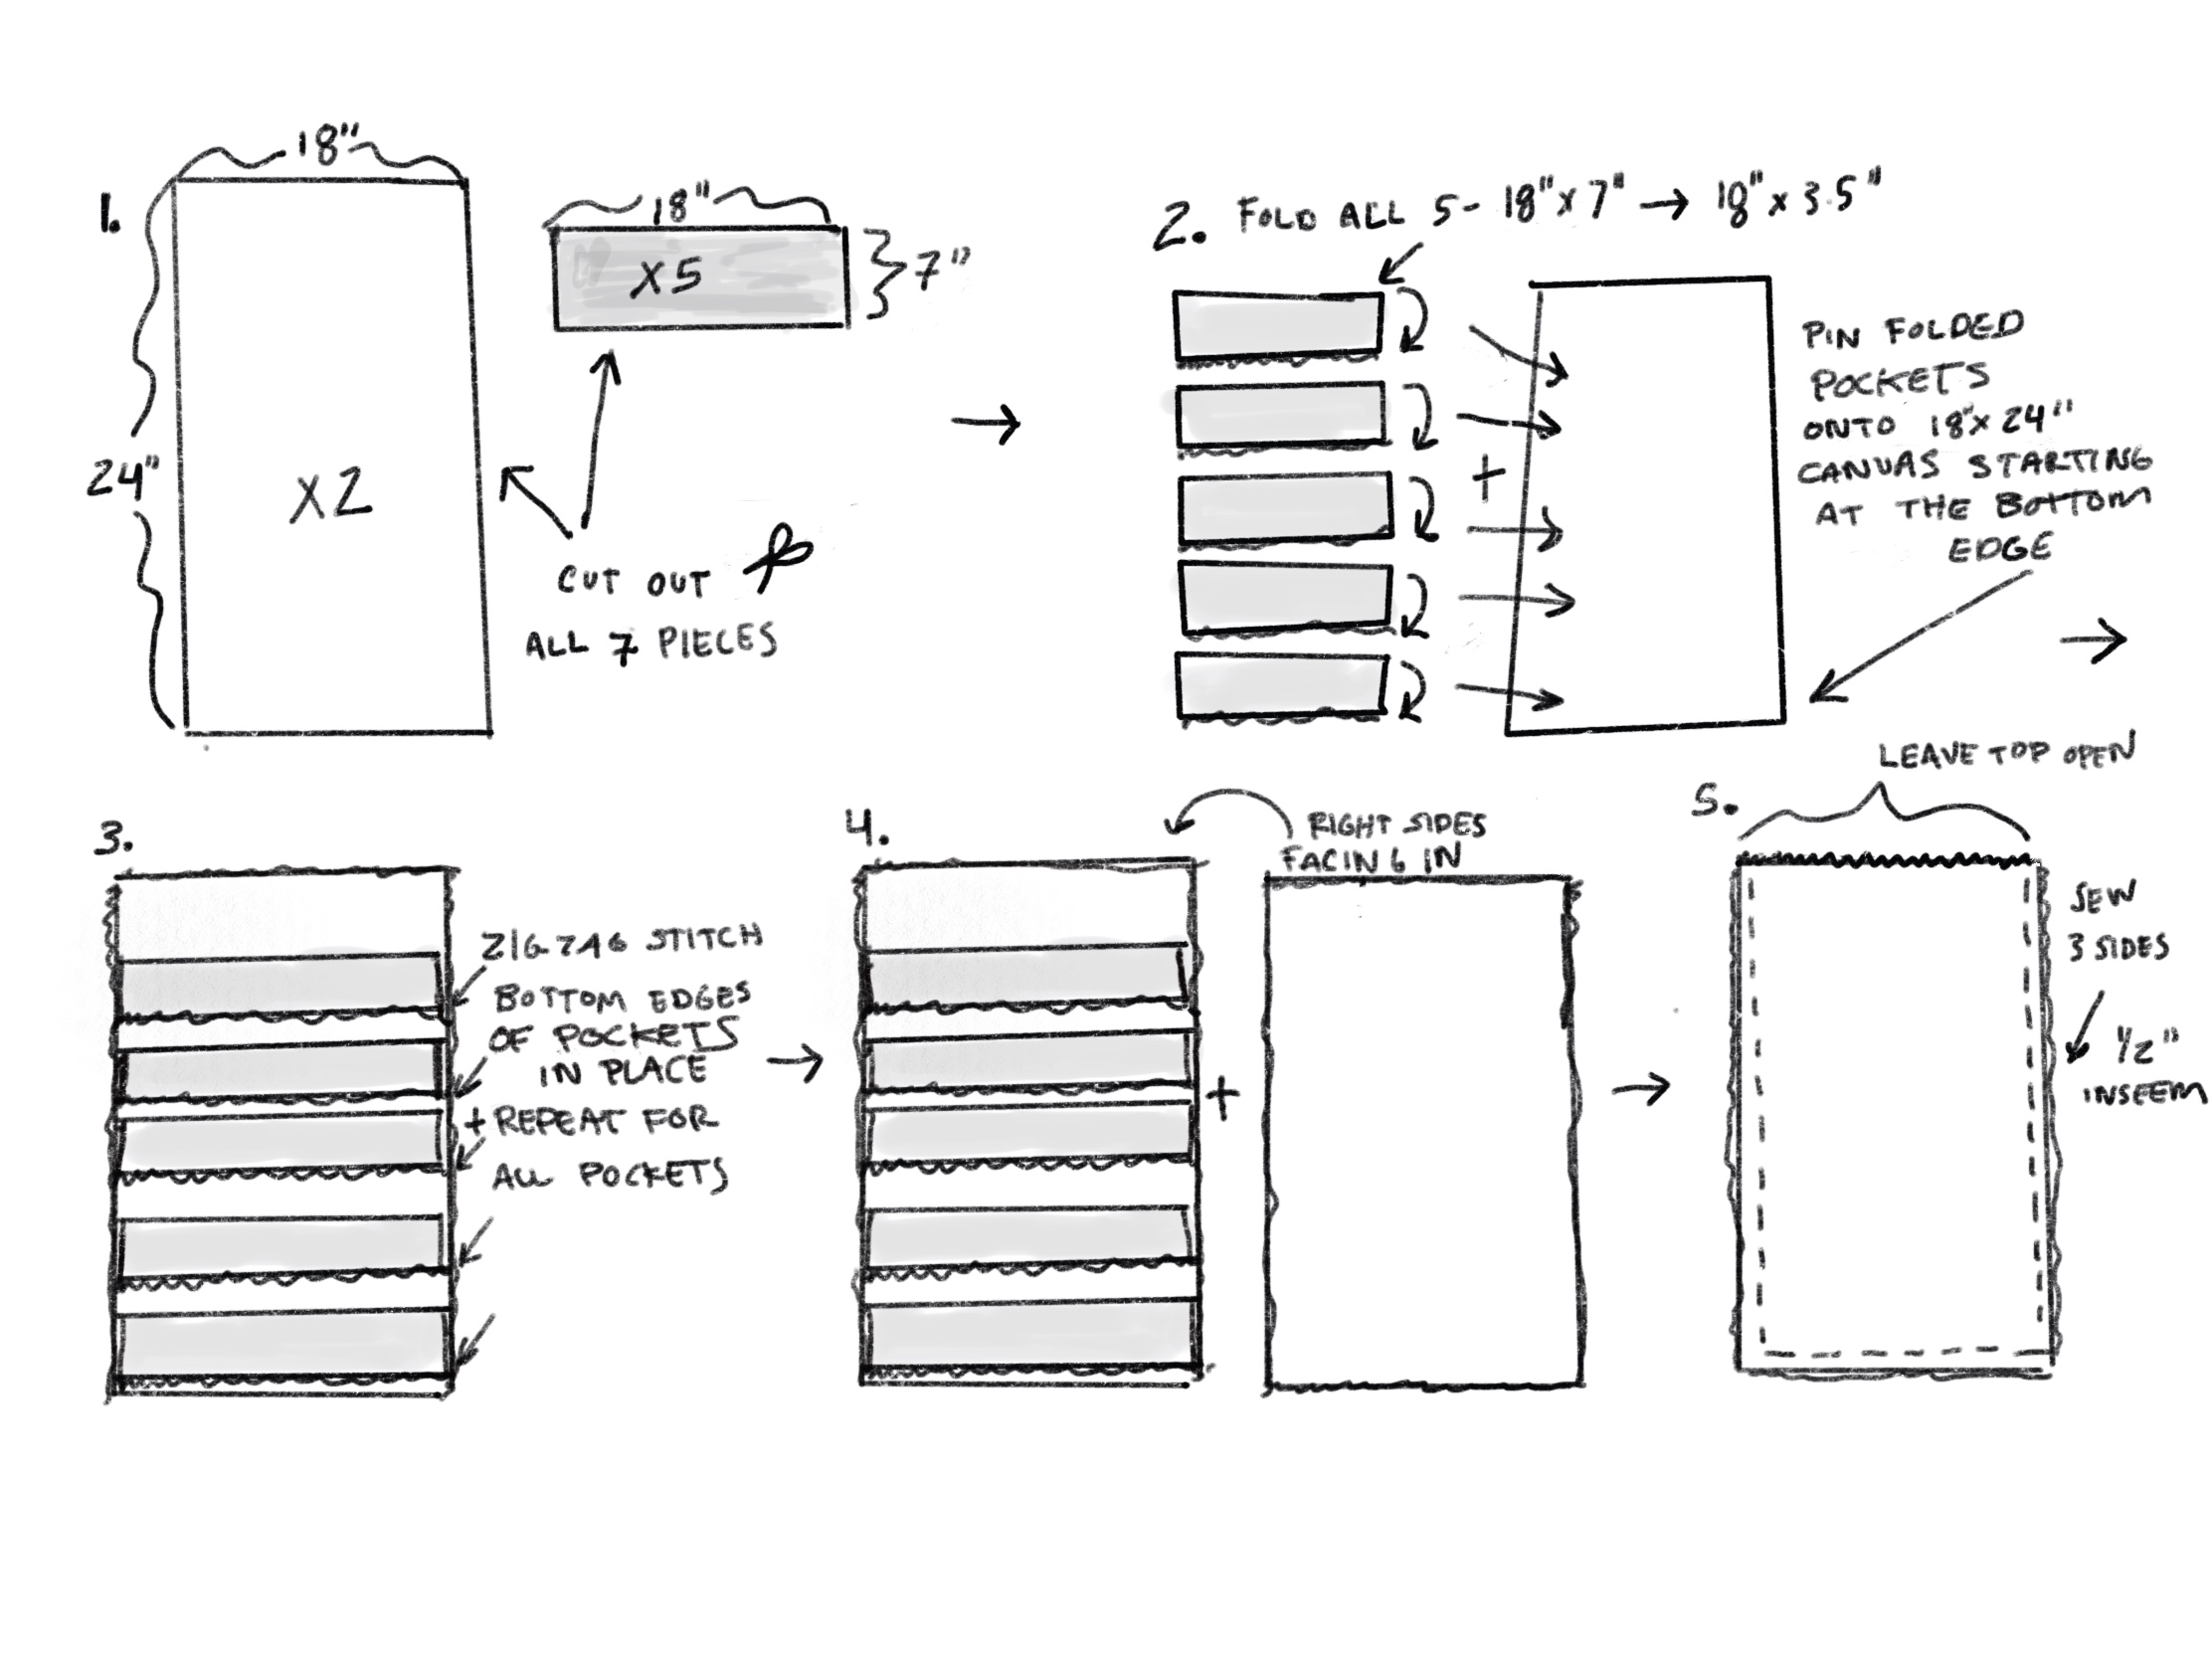
1. Measure and cut your fabric. You will need two canvas rectangles measuring 18”x24” and five canvas rectangles measuring 18”x7″.
2. Fold the five 18’x7” squares in half so the bottom edges line up and you have long thin rectangles that measure 18” x 3.5”.
3. Pin the five folded rectangles to one of the larger rectangle pieces of canvas so that the folded edge runs horizontally across the width of the canvas. Be sure that each folded edge points up and in the same direction with the the cut edges pointed down. Pin the first pocket so the bottom raw edges of the folded rectangle and the larger rectangle edge meet at the bottom. Pin the second folded rectangle ½” above the folded edge of rectangle one, and the third folded rectangle ½” above the second rectangle. Repeat for the fourth and fifth pockets. You’ll have a few inches of extra space above the last pocket.
Using your sewing machine, sew the pockets in place. Sew the two short sides of each pocket in place with a regular running stitch. Secure the cut bottom 18” edge in place using a zig-zag stitch. The zig-zag stitch along the bottom should be tight and wide enough so that it securely attaches all three layers together. Make sure to leave the folded 18” top edge open and repeat for the remaining four pockets.
4. Place the second, large 18”x24” rectangle piece of canvas directly over the top of the first, with the pockets concealed in-between the two sides (right sides facing in).
Zig-zag stitch along the two long (24”) sides and the bottom 18” edge of the rectangles but leave the (18”) top edge open. Sew ½” from the edge but be sure you go through all the layers of the canvas (this means that in some areas you are sewing both the pockets and the front and back sections; equaling 4 layers). Use care when sewing over bulky areas.
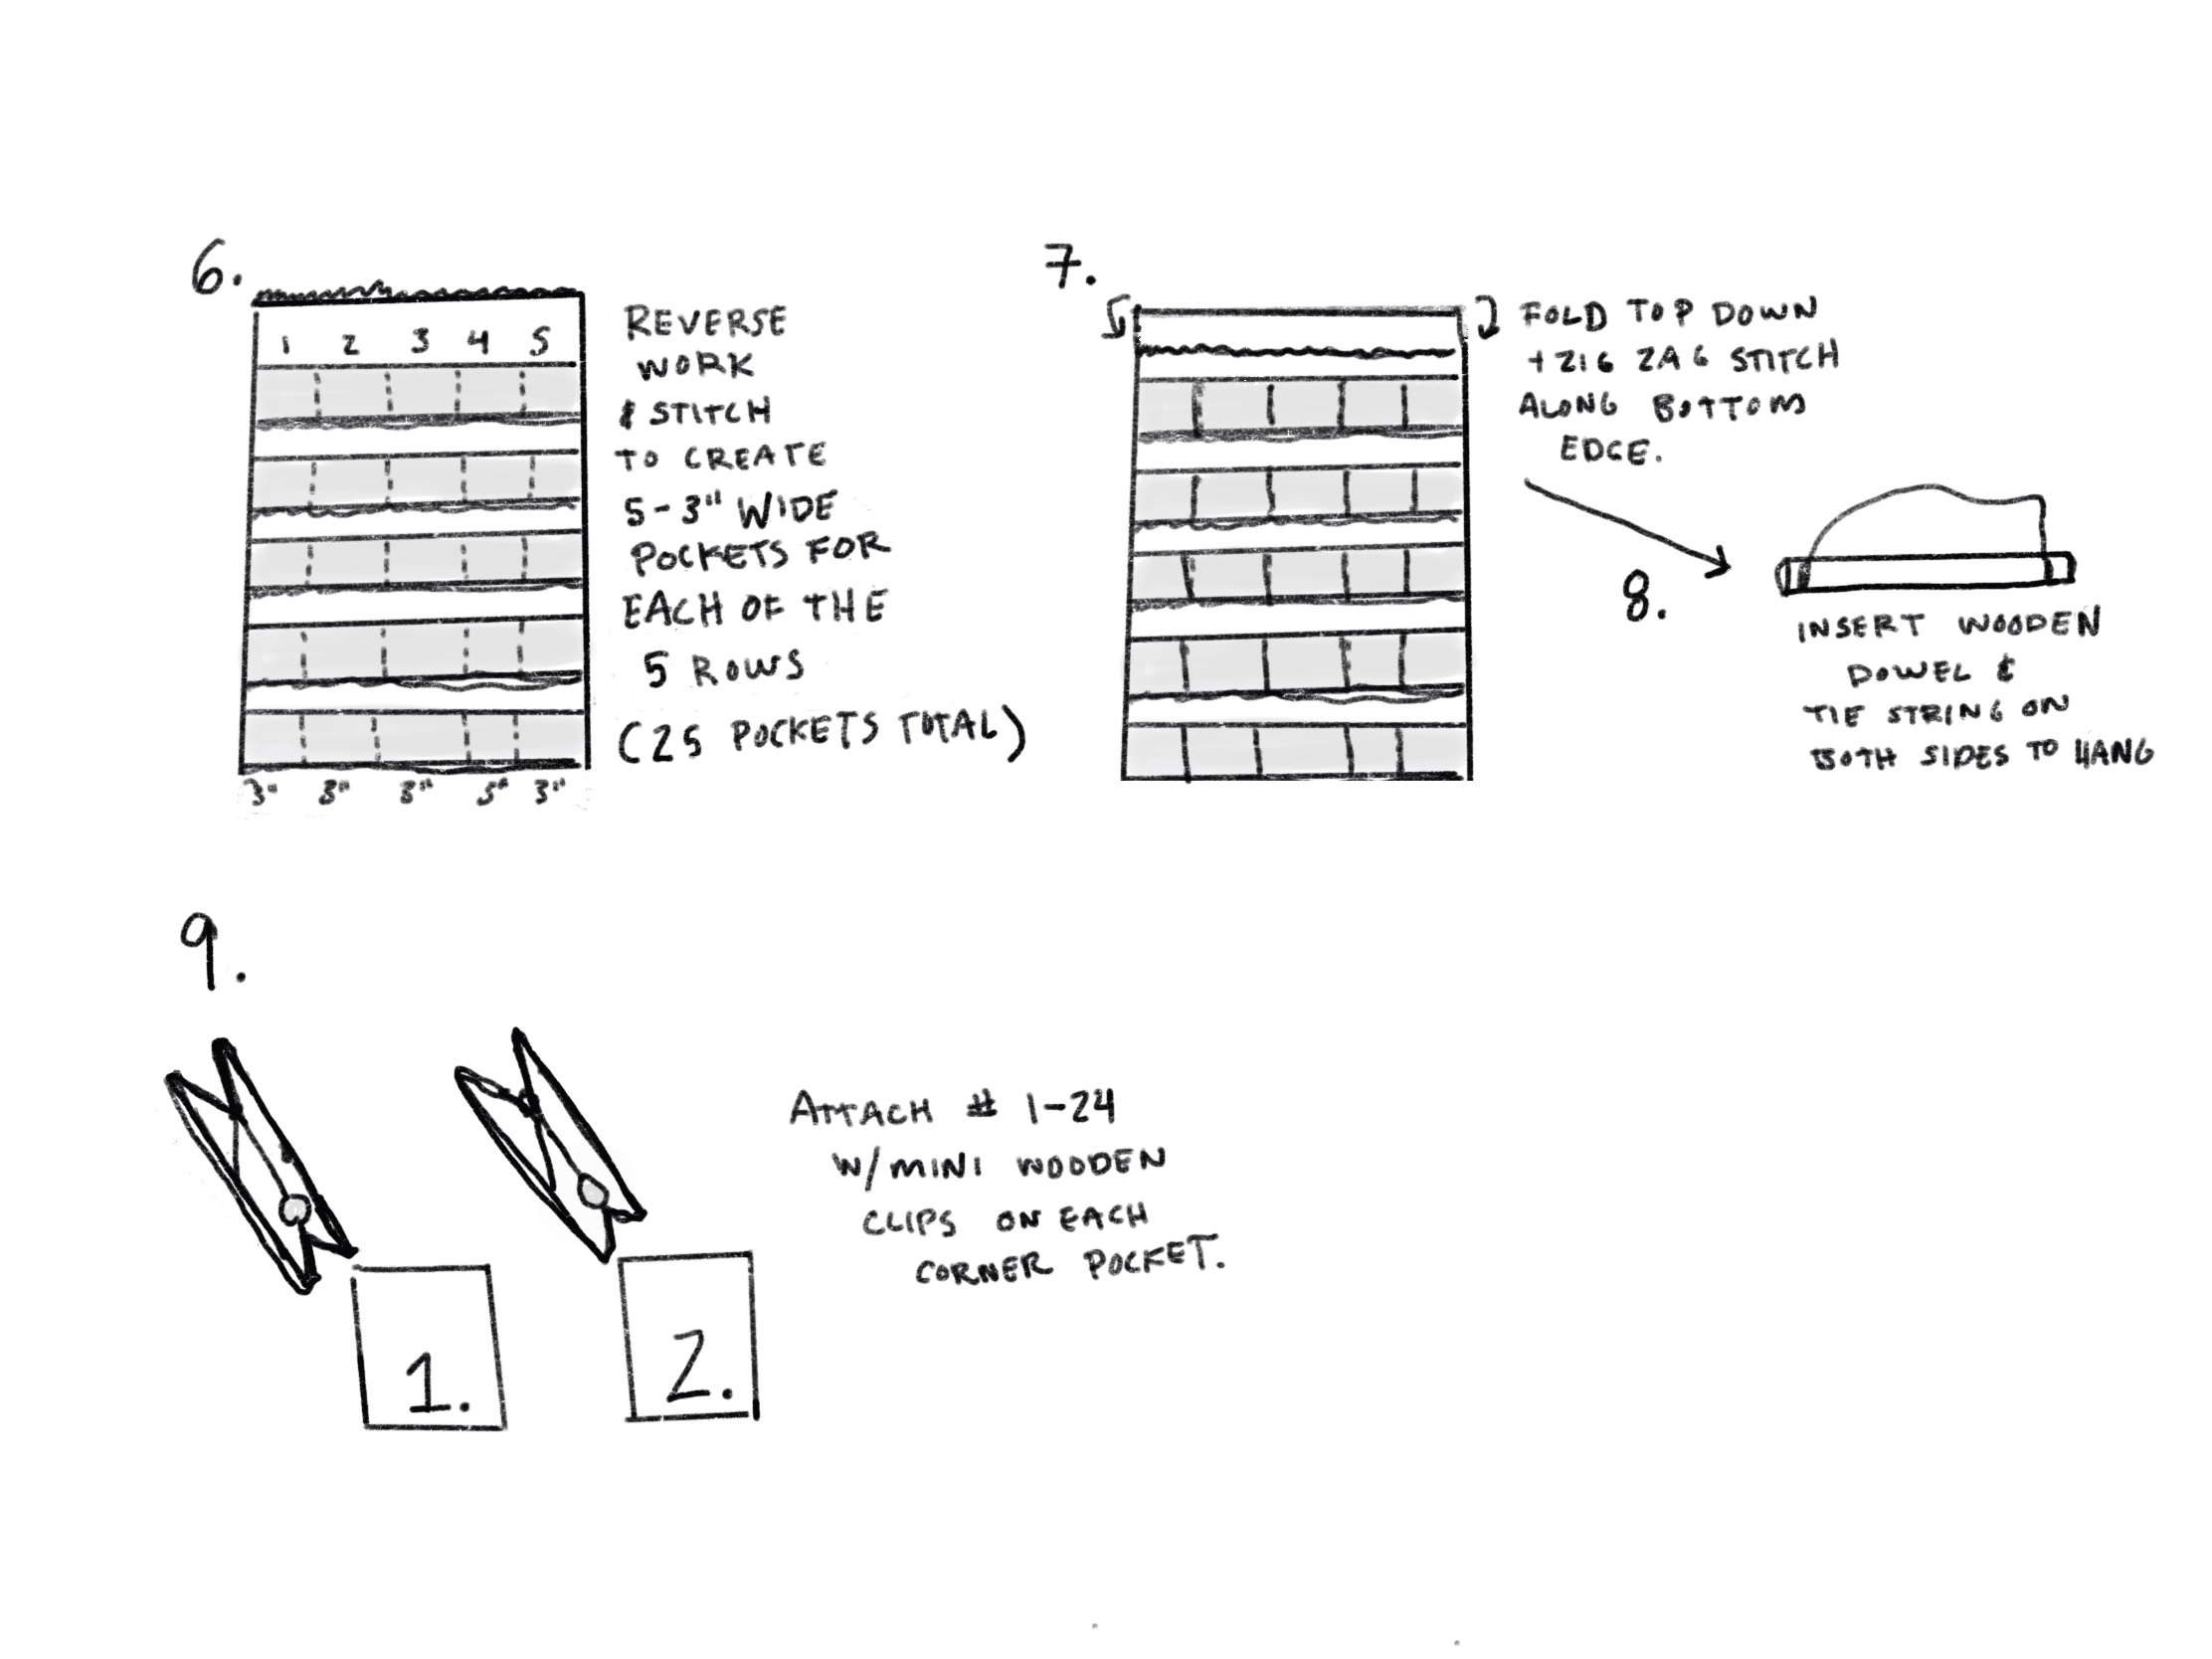
6. If needed, trim any extra fabric along the sewn border and reverse your work through the open edge of your rectangle so the pockets face out. Use your hand to poke out the two bottom corners and flatten the piece with your hands. Check your work to make sure that the pockets are securely attached, especially on the bottom edge. If not, you can sew over any weak seams.
With a ruler and fabric chalk, measure and mark 3” pocket openings along the 18” pocket width (this will create five separate pocket nooks). Using the first chalked pocket as your guide, mark the remaining four rectangular pockets to match the first. Sew all marks straight down from the top of the pockets folded edge to the bottom. Be sure to only sew from the top edge to the bottom edge of the pocket, stopping where the pocket stops and starting again on the next pocket. You will be sewing through all four layers of fabric and creating 25 separate pockets (five pockets on each of the five rows).
7. Fold the top two layers of the rectangle down 1 1/2” inches and zig-zag the raw edges of the fabric in place along the cut edge. This will create a small pocket for the dowel to go through. Be sure the zig-zag stitch is secure; if needed, go over the stitches a second time.
8. Place the dowel through the narrow pocket opening and tie ends of the string to either side of the dowel.
9. To mark the calendar pockets, we suggest cutting 25 small rectangles of paper roughly 1”x 1.5” each. With a pen or number stamps, print a number (1-24) on each piece of paper. Pin each numbered paper to a pocket, starting from the left side to the right and working from the top down. Use the last (25th) pocket to store any extra clips.
//
Thanks to Rose Pearlman for preparing this tutorial and preparing the sketches. Rose is an artist, teacher, and textile designer. With a background in fine arts and a love of well designed functional objects, her creations blur the lines between art and craft and pushes the boundaries with non-traditional techniques and materials. Rose teaches monthly rug hooking workshops in and around her home in NYC, and also welcomes commissions for one of a kind constructions in decor and home furnishings. Her work has been featured in fiber magazines, galleries, and numerous online design sites. Her book Modern Rug Hooking is available wherever books are sold. Follow along with her functional craft projects at @art_objects_ She lives in Brooklyn, NY with her family.
This post includes affiliate links to online shops. Reading My Tea Leaves might earn a small commission on the goods purchased through those links, but most of these supplies can be found locally right in your own community. If you’d like to support this site directly, you can contribute directly here. Thanks so much for supporting this work.

14 Comments
If it helps anyone looking for non-gift ideas, when I was growing up, we used a cloth calendar (basically just like this, except manufactured and printed) with a little cloth mouse that moved to the next pocket each day. My brother and I loved it enough as kids to fight over who got to move the mouse!
ah, fantastic! might just need to borrow!
We had the same one when I was a kid. Same fights over moving the mouse, too. ❤️
RUNS OFF TO FIND MOUSE!
Raid the scrap box to make a little mouse, a twine tail and little button eyes.
Love love love. Maybe a “spice rack” for the other 11 months?
matchbox car caddy? hair elastic wrangler?
The possibilities are endless!! Thank you and Rose for providing these amazing tutorials.
I love this so much!!! Thank you for this awesome project – beautiful, functional, festive, and minimal waste. Could you please also do a post on activity-based advent ideas?
Have a few in the archive already! Just search advent calendar!
This is so funny because when I saw the wall hanging post, I thought it’d be perfect for Advent! I can see now I wasn’t the only one 😉 I’ve perhaps bitten off more than I can chew with a homemade Advent calendar because I scooped up some Rifle Paper Co holiday cotton fabric to use for the pouches … and I haven’t even started. Ha! There’s always next year! Bravo on all these fabulous ideas, Erin!! I’ve been so excited for each post.
You and rose could totally sell these!!! I’d buy one, as one who would So love one but alas no sewing machine
Beautiful design and photos.
I wanted to check on the measurements to see if I am missing something. The 18″ rectangle and 5 – 3″ pockets would be only 15″ of the rectangle? Also, after sewing the rectangle side seams at 1/2″ each and turning the project inside out, you would be left with a 17″ rectangle.
Thank you!
Hey Amy, Good catch, seems like Rose’s measurements might not be perfect here, but the end result will be very similar–it’s truly a choose-your-own-adventure project, so you can customize the size to be whatever you’d like!
Comments are moderated.